mongodb replset 搭建

简介

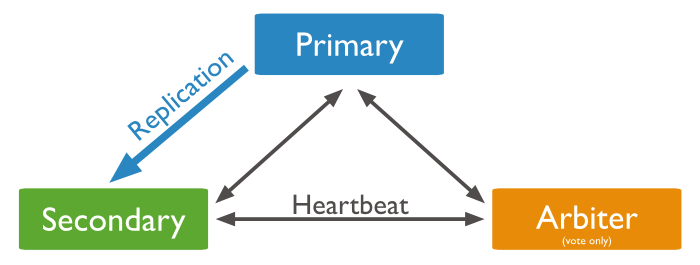
Mongodb 副本集由一组Mongod实例(进程)组成,包含一个Primary节点和多个Secondary节点或者Arbiter节点。
副本集的所有写操作都交给Primary,Secondary从Primary同步oplog到本实例,以保持复制集内所有成员存储相同的数据集,实现数据的高可用。

常见场景
  • 数据冗余
    集群可增加延迟写的节点,防止误操作
  • 读写分离
    适合读多写少的业务
典型结构

mongo结构

集群中的所有节点都可接受读操作;默认的驱动连接时读主节点,可设置read_prefrence指定

A replica set can have up to 50 members but only 7 voting members.

一个集群可以又最多50个节点,但有7个可投票的节点

节点角色

  1. 主节点(primary)

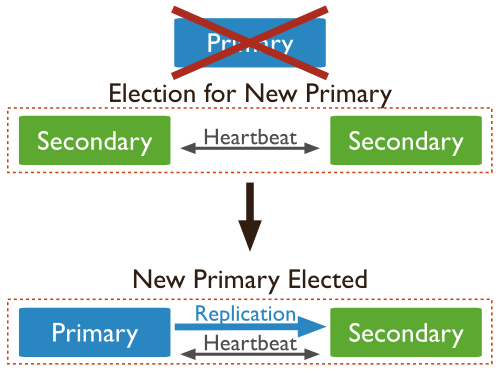
可接收所有的读写请求;同步oplog到从节点。一个Replica Set只能有一个Primary节点,当Primary挂掉后,其他Secondary或者Arbiter节点会重新选举出来一个主节点。

  1. 副本节点(secondary)

与主节点保持同样的数据集。当主节点挂掉的时候,参与选主。

  1. 仲裁者(arbiter)

不保持数据,不可能成为主节点,只进行投票选举主节点。为了打破投票中的偶数个节点的情况,Arbiter几乎没什么大的硬件资源需求.

Do not run an arbiter on systems that also host the primary or the secondary members of the replica set.

不要把仲裁节点与主节点或者从节点放在一台机器

两种结构

  • PSS

Primary + Secondary + Secondary模式,通过Primary和Secondary搭建的Replica Set

PSS

  • PSA

Primary + Secondary + Arbiter模式,使用Arbiter搭建Replica Set
PSA

偶数个数据节点,加一个Arbiter构成的Replica Set

选举机制

副本集通过 replSetInitiate 命令或 rs.initiate() 命令进行初始化。

初始化后各个节点开始发送心跳消息,并发起 Primary 选举操作,获得大多数成员投票支持的节点,会成为 Primary,其余节点成为 Secondary。

1
2
3
4
5
6
7
8
9
config = {
_id : "test_replset", # 副本集名称
members : [
{_id : 0, host : "rs1.example.net:27017"}, # 节点列表
{_id : 1, host : "rs2.example.net:27017"},
{_id : 2, host : "rs3.example.net:27017"},
]
}
rs.initiate(config)

假设复制集内投票成员(后续介绍)数量为 N,则大多数为 N/2 + 1,当复制集内存活成员数量不足大多数时,整个复制集将无法选举出 Primary,复制集将无法提供写服务,处于只读状态

  • Mongodb副本集的选举基于Bully算法,这是一种协调者竞选算法

  • Primary 的选举受节点间心跳、优先级、最新的 oplog 时间等多种因素影响

特殊角色
  • Arbiter

Arbiter 节点只参与投票,不能被选为 Primary,并且不从 Primary 同步数据。

  • Priority==0

Priority0节点的选举优先级为0,不会被选举为 Primary。

  • Vote==0

Mongodb 3.0里,复制集成员最多50个,参与 Primary 选举投票的成员最多7个,其他成员(Vote0)的 vote 属性必须设置为0,即不参与投票。

  • Hidden==true

Hidden 署行的 节点不能被选为primary(Priority 为0),并且对client 不可见。

  • Delayed==time seconds

Delayed 节点必须是 Hidden 节点,否则会出现数据不一致的情况; 其数据落后与 Primary 一段时间(可配置,比如半小时1小时等)

所有角色
Number Name State Description
0 STARTUP 还不是集群中的活跃点,读取配置阶段
1 PRIMARY 唯一的写节点
2 SECONDARY 从节点,主节点数据的拷贝
3 RECOVERING Members either perform startup self-checks, or transition from completing a rollback or resync.
5 STARTUP2 已经加入集群,同步数据
6 UNKNOWN
7 ARBITER 仲裁,投票选举primary
8 DOWN 不可达节点
9 ROLLBACK
10 REMOVED c曾经再集群,但被移除
触发选举条件
  • 新增一个节点到副本集
  • 初始化一个副本集
  • primary放弃角色,如 rs.stepDown()/rs.reconfig()
  • 从库不能连接到主库(默认超过10s,可通过heartbeatTimeoutSecs参数控制),由从库发起选举

副本集的自动failover是通过心跳检测实现的,进而实现高可用
mongo-failover

读写配置

Read Preference

All read preference modes except primary may return stale data because secondaries replicate operations from the primary with some delay. Ensure that your application can tolerate stale data if you choose to use a non-primary mode.

除了primary节点,其他的都有可能读到脏数据。保证你的app能够容忍脏数据

Read Preference Mode Description
primary 优先主节点,默认

Multi-document transactions that contain read operations must use read preference primary. All operations in a given transaction must route to the same member.
primaryPreferred 主节点优先,主不可用,读从节点
secondary 从节点读取
secondaryPreferred 从节点优先,没有从节点可用,读主节点
nearest 网络延迟最少的节点,不管主从

Write Concern

Write concern describes the level of acknowledgment requested from MongoDB for write operations

写操作的确认

选项如下:

1
{ w: <value>, j: <boolean>, wtimeout: <number> }

w: 写操作已经传播了几个mongod实例

j: 等待写操作写入磁盘journal

wtimeout: 写操作阻塞时间

value description
w: 1,默认值(写入主节点)
w: 0,不需要确认写操作,可能会抛出异常
w: >1,
majority 大多数数据可投票节点
写入一个标记的节点

Hidden, delayed, and priority 0 members with member[n].votes greater than 0 can acknowledge majority write operations.

Read Concern(一致性/隔离性)

level description
local
available
marjority
linearizable
snapshot

配置

  • db version v4.2.0
  • 配置文件,复制三份,修改

path/dbPath/pidFilePath

bindIp:如果外网,需要将ip绑定为0.0.0.0

1
2
3
4
5
6
7
8
9
10
11
12
13
14
15
16
17
18
19
20
21
22
23
24
25
26
27
28
29
30
31
32
33
34
35
36
37
38
39
40
41
42
43
44
# for documentation of all options, see:
# http://docs.mongodb.org/manual/reference/configuration-options/

# where to write logging data.
systemLog:
destination: file
logAppend: true
path: /var/log/mongodb/mongod-27017.log

# Where and how to store data.
storage:
dbPath: /var/lib/mongo-27017
journal:
enabled: true
# engine:
# wiredTiger:

# how the process runs
processManagement:
fork: true # fork and run in background
pidFilePath: /var/run/mongodb/mongod-27017.pid # location of pidfile
timeZoneInfo: /usr/share/zoneinfo

# network interfaces
net:
port: 27017
bindIp: 127.0.0.1 # Enter 0.0.0.0,:: to bind to all IPv4 and IPv6 addresses or, alternatively, use the net.bindIpAll setting.


#security:

#operationProfiling:

replication:
replSetName: screensaver # replset名称,同一副本集取值相同
oplogSizeMB: 4096

#sharding:

## Enterprise-Only Options

#auditLog:

#snmp:

这里我搞了三个,启动

1
2
3
mongod -f /etc/mongod-27017.conf
mongod -f /etc/mongod-27018.conf
mongod -f /etc/mongod-27019.conf

随便进入一个实例:

1
2
3
4
5
6
7
8
9
10
11
12
13
14
15
16
17
18
19
20
21
22
23
24
25
26
27
28
29
30
31
32
33
34
35
36
37
38
39
40
41
42
43
44
45
46
47
48
49
50
51
52
53
54
55
56
57
58
59
60
61
62
63
64
65
66
67
68
69
70
71
72
73
74
75
76
77
78
79
80
81
82
83
84
85
86
87
88
89
90
91
92
93
94
95
96
97
98
99
> rs.status()
{
"operationTime" : Timestamp(0, 0),
"ok" : 0,
"errmsg" : "no replset config has been received",
"code" : 94,
"codeName" : "NotYetInitialized",
"$clusterTime" : {
"clusterTime" : Timestamp(0, 0),
"signature" : {
"hash" : BinData(0,"AAAAAAAAAAAAAAAAAAAAAAAAAAA="),
"keyId" : NumberLong(0)
}
}
}
> rs.initiate()
{
"info2" : "no configuration specified. Using a default configuration for the set",
"me" : "127.0.0.1:27017",
"ok" : 1,
"$clusterTime" : {
"clusterTime" : Timestamp(1568625811, 1),
"signature" : {
"hash" : BinData(0,"AAAAAAAAAAAAAAAAAAAAAAAAAAA="),
"keyId" : NumberLong(0)
}
},
"operationTime" : Timestamp(1568625811, 1)
}
screensaver:OTHER> rs.status()
{
"set" : "screensaver",
"date" : ISODate("2019-09-16T09:23:35.861Z"),
"myState" : 1,
"term" : NumberLong(1),
"syncingTo" : "",
"syncSourceHost" : "",
"syncSourceId" : -1,
"heartbeatIntervalMillis" : NumberLong(2000),
"optimes" : {
"lastCommittedOpTime" : {
"ts" : Timestamp(1568625814, 4),
"t" : NumberLong(1)
},
"lastCommittedWallTime" : ISODate("2019-09-16T09:23:34.040Z"),
"readConcernMajorityOpTime" : {
"ts" : Timestamp(1568625814, 4),
"t" : NumberLong(1)
},
"readConcernMajorityWallTime" : ISODate("2019-09-16T09:23:34.040Z"),
"appliedOpTime" : {
"ts" : Timestamp(1568625814, 4),
"t" : NumberLong(1)
},
"durableOpTime" : {
"ts" : Timestamp(1568625814, 4),
"t" : NumberLong(1)
},
"lastAppliedWallTime" : ISODate("2019-09-16T09:23:34.040Z"),
"lastDurableWallTime" : ISODate("2019-09-16T09:23:34.040Z")
},
"lastStableRecoveryTimestamp" : Timestamp(1568625814, 4),
"lastStableCheckpointTimestamp" : Timestamp(1568625814, 4),
"members" : [
{
"_id" : 0,
"name" : "127.0.0.1:27017",
"ip" : "127.0.0.1",
"health" : 1,
"state" : 1,
"stateStr" : "PRIMARY",
"uptime" : 19222,
"optime" : {
"ts" : Timestamp(1568625814, 4),
"t" : NumberLong(1)
},
"optimeDate" : ISODate("2019-09-16T09:23:34Z"),
"syncingTo" : "",
"syncSourceHost" : "",
"syncSourceId" : -1,
"infoMessage" : "could not find member to sync from",
"electionTime" : Timestamp(1568625811, 2),
"electionDate" : ISODate("2019-09-16T09:23:31Z"),
"configVersion" : 1,
"self" : true,
"lastHeartbeatMessage" : ""
}
],
"ok" : 1,
"$clusterTime" : {
"clusterTime" : Timestamp(1568625814, 4),
"signature" : {
"hash" : BinData(0,"AAAAAAAAAAAAAAAAAAAAAAAAAAA="),
"keyId" : NumberLong(0)
}
},
"operationTime" : Timestamp(1568625814, 4)
}
screensaver:PRIMARY>

初始化后,该实例成为primary,单机实例,增加其他节点

1
2
3
4
5
6
7
8
9
10
11
12
13
14
15
16
17
18
19
20
21
22
23
24
screensaver:PRIMARY> rs.add('127.0.0.1:27018')
{
"ok" : 1,
"$clusterTime" : {
"clusterTime" : Timestamp(1568625914, 2),
"signature" : {
"hash" : BinData(0,"AAAAAAAAAAAAAAAAAAAAAAAAAAA="),
"keyId" : NumberLong(0)
}
},
"operationTime" : Timestamp(1568625914, 2)
}
screensaver:PRIMARY> rs.addArb('127.0.0.1:27019')
{
"ok" : 1,
"$clusterTime" : {
"clusterTime" : Timestamp(1568625931, 1),
"signature" : {
"hash" : BinData(0,"AAAAAAAAAAAAAAAAAAAAAAAAAAA="),
"keyId" : NumberLong(0)
}
},
"operationTime" : Timestamp(1568625931, 1)
}

至此, PSA 模式的集群已经创建成功

jenkins

jenkins 安装

jdk安装
  1. 采用java8, 到官网下载jdk
  2. 解压配置, JAVA_HOME PATH,执行如下
1
2
3
4
[root@wpspic5 ~]# java -version 
openjdk version "1.8.0_161"
OpenJDK Runtime Environment (build 1.8.0_161-b14)
OpenJDK 64-Bit Server VM (build 25.161-b14, mixed mode)
Jenkins 安装
  1. 下载RPM包安装

jenkins安装也比较简单,有相应的rpm安装包

官网地址 选择合适的版本,下载安装

  1. yum安装

导入yum源

1
2
sudo wget -O /etc/yum.repos.d/jenkins.repo https://pkg.jenkins.io/redhat-stable/jenkins.repo
sudo rpm --import https://pkg.jenkins.io/redhat-stable/jenkins.io.key

安装

1
yum install jenkins

jenkins 配置

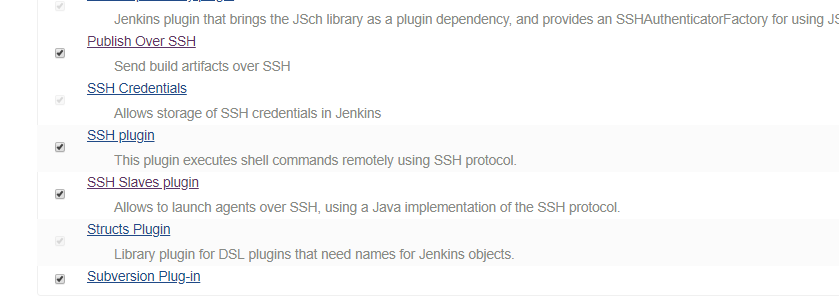
默认端口号是8080,直接访问,会进行一些初始化,及插件的安装

1568192488358

jenkins版本: 2.176.3-1.1

  1. 部署节点配置

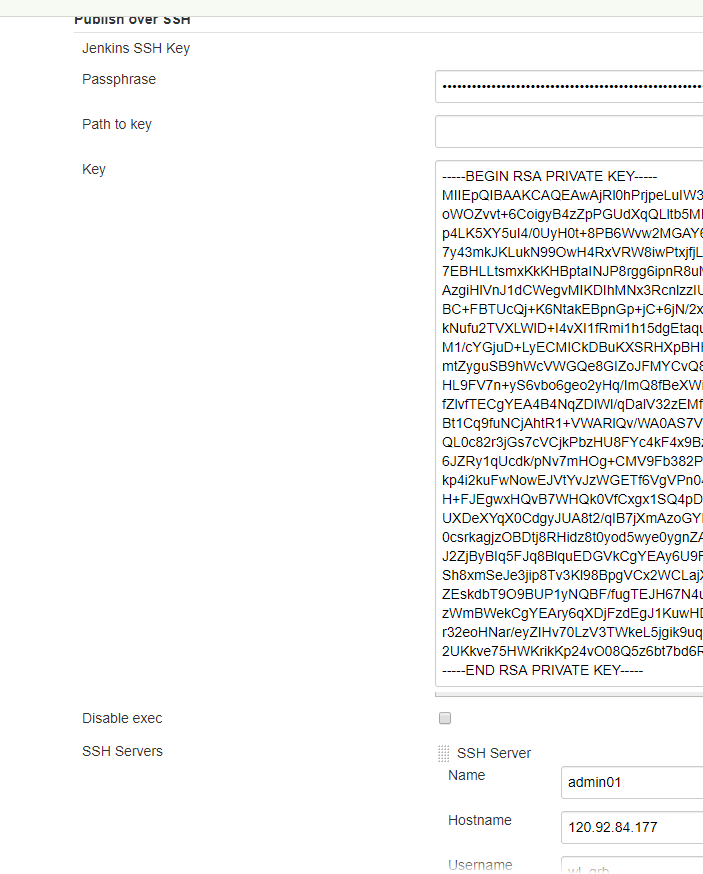
  • 进入jenkins主界面,点击左侧菜单的 “系统管理->系统设置”,拖动配置项到“Publish on ssh”

  • 新增登录主机的ssh private key/ password的登录信息

    jenkins-1

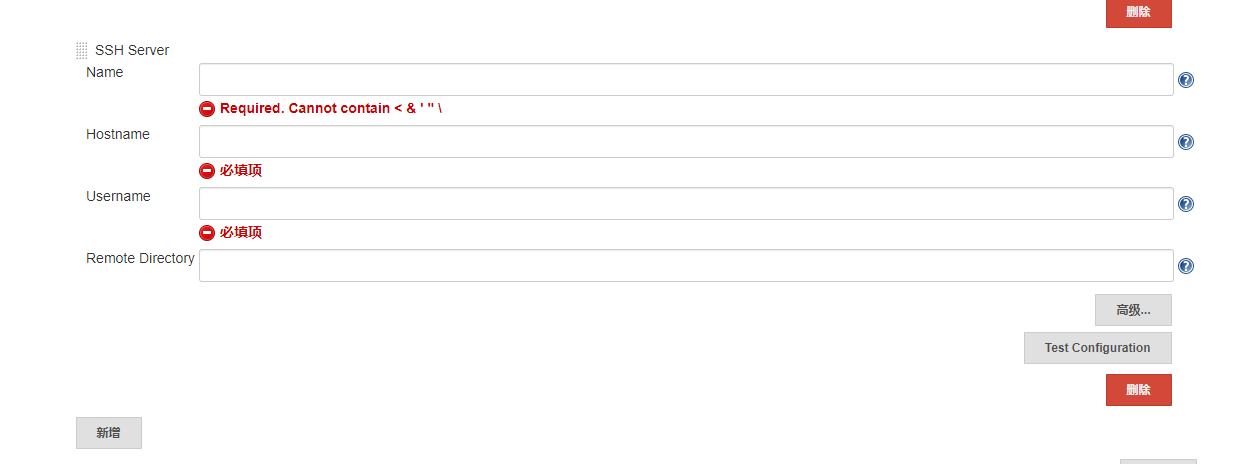
  • 增加节点,包括登录主机的用户名,IP地址,工作目录等, 可以新增多个节点

    • Name: 主机标识符,用于区分
    • Hostname: 主机ip地址
    • Username: 登录主机的用户名
    • Remote Directory: 远端工作目录

jenkins-host

  1. 部署配置

  • 新建部署项,在主页左边栏,“新建任务“,起个有意义的名称,下面选择”自由风格的软件项目

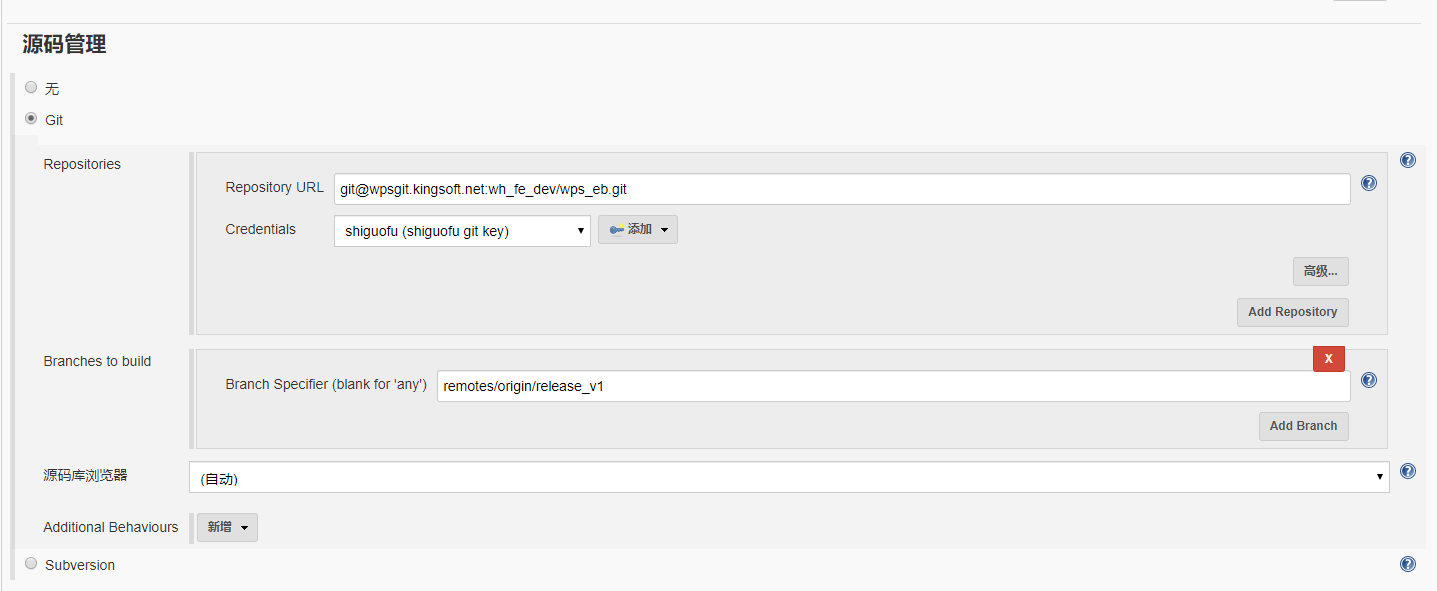
    找到源码管理,配置Git 的Repo/credit(获取代码的key), 分支;

    如果可以正常获取,不会出现提示

    jenkins-source

    否则会出现如下提示,检查repo的配置是否写错误;检查key是不是有权限拉取代码

jenkins-source-1

  • 找到”构建“ 选项

    • 加入构建的命令,即打包操作(进入到工作目录,直接打包)
    1
    2
    3
    cd $WORKSPACE
    TAR_NAME=wps_eb_`date +%Y-%m-%d`.tar
    tar -cf $TAR_NAME ./
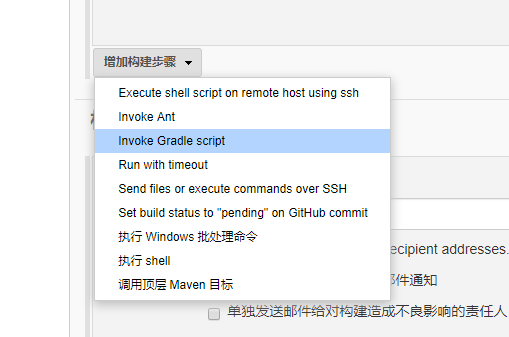
    • 增加构建步骤,选择 ”send files or execute commands over SSH“, 采用ssh发送项目文件到目标机器并执行命令部署

    1567994464334

    • 增加发送到目标机器后的操作命令,依赖于项目文件 (release/project_init.sh)
    1
    2
    3
    4
    5
    6
    7
    8
    9
    file_name=wps_eb_`date +%Y-%m-%d`.tar
    tmp_dir=/tmp/wps_eb_tmp
    log_dir=/data/log/pm2/wps_eb-admin
    echo $file_name
    sudo rm -rf $tmp_dir
    sudo mkdir -p $tmp_dir
    sudo tar -xf /tmp/$file_name -C $tmp_dir ./release/*
    cd $tmp_dir/release
    sudo ./project_init.sh /tmp/$file_name

一些shell脚本

最近在搞部署项目的功能,写了不少shell脚本,总结一下

1. sftp上传支持多条命令,用awk分隔文件路径获取文件名称($NF表示最后一列)

1
2
3
4
5
6
7
8
9
10
11
12
13
14
15
16
17
18
19
20
21
22
#!/bin/bash                                                                                                                           
function check() {
if [ -z $1 ]; then
echo "please give the filename"
return
fi
if [ ! -f $1 ]; then
echo "file not exists, exit..."
return
fi
echo "ls" > command.txt
echo "cd bj6-c-grb-screen-admin01/史国富" >> command.txt
echo "put $1" >> command.txt
filename=`echo $1 | awk -F/ '{print $NF}'`
echo $filename
echo "ls $filename" >> command.txt
sftp -P 2222 shiguofu@120.92.118.51 < command.txt
echo "Done"
}


check $1

2. 部署项目,未增加测试环境标识(sed修改),手动修改文件

环境变量传入: 由于sudo 会重新初始化环境变量,因此,可以在脚本中传入执行的变量PATH等

1
2
3
4
5
6
7
8
9
10
11
12
13
14
15
16
17
18
19
20
21
22
23
24
25
26
27
28
29
30
31
32
33
34
35
36
37
38
39
40
41
42
43
44
45
46
47
48
49
50
51
52
53
54
55
56
57
58
59
60
61
62
63
64
65
66
67
68
69
70
71
72
73
74
75
76
77
WALLE_NODE=10.13.88.152
WALLE_USER=root
WALLE_PASSWD=1qaz@WSX
zip_file_name=wps_eb_admin_`date +%Y%m%d%H%M%S`.tar
remote_dest_dir=/tmp
TEST_NODE=10.226.50.22

function copy_to_walle()
{
echo "copy to $WALLE_NODE"
cd ..
echo "tar service files..."
tar -cf /tmp/$zip_file_name ./*
echo "Done. tar file -> /tmp/$zip_file_name"
sshpass -p "$WALLE_PASSWD" scp /tmp/$zip_file_name $WALLE_USER@$WALLE_NODE:$remote_dest_dir
echo "copy to remote Done."
sshpass -p "$WALLE_PASSWD" ssh $WALLE_USER@$WALLE_NODE "
rm -rf /tmp/wps_eb_tmp
mkdir -p /tmp/wps_eb_tmp
tar -xf /tmp/$zip_file_name -C /tmp/wps_eb_tmp
"
}

function deploy()
{
if [ -z $1 ]; then
echo "please give the ip address as the first param"
return
fi
USER=root
echo "deploy to test: $1"
echo "tar service files..."
tar -cf /tmp/$zip_file_name ./*
echo "Done. tar file -> /tmp/$zip_file_name"
if [ ! -z $2 ]; then
USER=$2
fi
if [ ! -z $3 ]; then
sshpass -p "$3" scp /tmp/$zip_file_name $USER@$1:$remote_dest_dir
sshpass -p "$3" ssh $USER@$1 << eeooff
sudo -i
tar -xf $remote_dest_dir/$zip_file_name -C /tmp/ ./release/*;
cd /tmp/release
PATH=$PATH:/usr/local/bin && ./project_init.sh $remote_dest_dir/$zip_file_name
eeooff
else
scp /tmp/$zip_file_name $USER@$1:$remote_dest_dir
echo "Done copy to remote host..."
ssh $USER@$1 << eeooff
sudo -i
tar -xf $remote_dest_dir/$zip_file_name -C /tmp/ ./release/*;
cd /tmp/release
. /etc/profile && ./project_init.sh $remote_dest_dir/$zip_file_name
eeooff
fi
rm /tmp/$zip_file_name
# ./project_init.sh $remote_dest_dir/$zip_file_name
}


function deploy_test()
{
cd ..
sed -i 's/production/development/g' pm2.json
deploy 10.226.50.22 root 123456
sed -i 's/development/production/g' pm2.json
}

echo $1
if [ -z $1 ]; then
deploy_test
elif [ "$1" == "walle" ]; then
copy_to_walle
else
cd ..
deploy $1 $2 $3
fi

3. 初始化服务环境,安装必要的包

1
2
3
4
5
6
7
8
9
10
11
12
13
14
15
16
17
18
19
20
21
22
23
24
25
26
27
28
29
30
31
32
33
34
35
36
37
38
39
40
41
42
43
#!/bin/bash                                                                                                                                                                    
SOFT_DIR=/data/soft

function install_webp(){
cd $SOFT_DIR
wget https://storage.googleapis.com/downloads.webmproject.org/releases/webp/libwebp-1.0.3-linux-x86-64.tar.gz
tar -xf libwebp-1.0.3-linux-x86-64.tar.gz
cd libwebp-1.0.3-linux-x86-64/bin
if [ -f /usr/bin/cwebp ]; then
mv /usr/bin/cwebp /usr/bin/cweb.bak
fi
cp cwebp /usr/bin/
}

function install_node(){
cd $SOFT_DIR
wget https://nodejs.org/dist/v10.13.0/node-v10.13.0-linux-x64.tar.xz
tar xvf node-v10.13.0-linux-x64.tar.xz
echo "export PATH=$PATH:$SOFT_DIR/node-v10.13.0-linux-x64/bin" >> /etc/profile
echo "export NODE_PATH=/data/soft/node-v10.13.0-linux-x64/lib/node_modules" >> /etc/profile
source /etc/profile
npm install pm2 -g
echo "10.13.0.29 wpsgit.xxx.net" >> /etc/hosts
echo "10.13.0.98 cdnshow.xxx.kingsoft.net" >> /etc/hosts
echo "120.92.115.93 suc.xxx.kingsoft.net" >> /etc/hosts
}
# mongodb 下载地址:https://repo.mongodb.org/yum/redhat/7/mongodb-org/3.4/x86_64/RPMS/

if [ ! -d $SOFT_DIR ];then
rm -rf $SOFT_DIR
mkdir -p $SOFT_DIR
fi
which cwebp # 采用which判断是否存在,获取返回值
code=`echo $?`
echo $code
if [ $code != 0 ]; then
install_webp
fi
which npm
code=`echo $?`
if [ $code != 0 ]; then
install_node
fi

4. 服务初始化脚本

服务需要sudo 执行, 增加了source 初始化环境的头

1
2
3
4
5
6
7
8
9
10
11
12
13
14
15
16
17
18
19
20
21
22
23
24
25
26
27
28
29
30
31
32
33
34
35
36
37
38
39
40
41
42
43
44
45
46
47
48
49
50
51
52
53
54
55
56
57
58
#!/bin/bash
source /etc/profile

function init()
{
if [ ! -z $1 ] && [ -d $1 ]; then
final_dir=$1;
else
echo "$1 did not exists... exit"
return
fi
echo "install package..."
cd $1
if [ ! -z $2 ]; then
sed -i "s/production/$2/g" pm2.json
fi
source /etc/profile
npm config set @wps:registry http://120.92.93.69:4873
npm install --no-save --production
npm install -g cnpm --registry=https://registry.npm.taobao.org
cnpm install canvas
echo "install Done."
echo "stop service sxxx-eb.."
sh -c 'source /etc/profile && pm2 delete wps_eb-admin' &>/tmp/pm2.log
echo "stopped"
sleep 1
echo "start service xxx-eb"
sh -c 'source /etc/profile && pm2 start pm2.json' &>/tmp/pm2.log
echo "start Done."
}


function deploy_by_tar()
{
release_dir=/data/www
dest_dir=/data/release/xxx_ebook_admin/`date +%Y%m%d-%H%M%S`
final_xxx_ebook_dir=$release_dir/xxx_ebook_admin
if [ ! -z $1 ] && [ -f $1 ]; then
echo "deploy with $1..."
zip_file_name=$1
else
echo "$1 did not exists... exit"
return
fi
mkdir -p $release_dir
mkdir -p $dest_dir
echo "untar package to $dest_dir"
`tar -xf $zip_file_name -C $dest_dir`
echo "untar Done."
echo "ln -sfn $dest_dir $final_xxx_ebook_dir"
ln -sfn $dest_dir $final_xxx_ebook_dir
echo 'Done.'
init $final_wps_ebook_dir $2
rm $zip_file_name
}

./init_env.sh
deploy_by_tar $1 $2

shell知识点.md

1. shell函数参数传递不需要在参数列表,是通过$1, $2….这样获取,如

1
2
3
4
5
6
7
8
9
10
11
12
#!/bin/bash

function deploy_one_host() # 函数定义,小括号不是必须的
{
cd wps_pic
zip_file_name=wps_pic_`date +%Y%m%d%H%M%S`.zip
zip "$zip_file_name" ./* -q
scp $zip_file_name root@$1:/tmp # 获取第一个参数
ssh root@$1 "sh exec.sh $zip_file_name;" # ssh 在远端执行命令,多个以分号分隔
}

deploy_one_host 10.229.26.143 # 传递一个参数,多个可在后面添加,以空格分隔

2. shell 命令行参数

1
2
3
#!/bin/bash

echo $1, $2 # 获取命令行参数,第一个第二个, 如果没有就为空

执行:

./exec.sh a b

3. if 判断

1
2
3
4
5
6
7
8
9
10
11
12
13
14
15
16
17
function check()
{
if [ ! -d "$release_name" ]; then
echo "$release_name"" not exists, check the online dir"
return
fi
if [ -z "$1" ]; then
echo "must give the dir"
return
elif [ ! -d "$1" ]; then
echo "$1" "not exists please give the dir will online"
return
else
echo "check ok"
do_online $1
fi
}

-d 判读是不是一个目录,如果是为真

-f 判断是不是一个普通文件,是为真

-z 判断字符的长度是不是为0,为0则为真

==/!= 字符串相等/不等