Leetcode之无重复字符串的最长子串

题目

1
给定一个字符串 s ,请你找出其中不含有重复字符的 最长 子串 的长度。

示例

1
2
3
4
5
6
7
8
9
10
11
12
13
14
15
16
示例 1:

输入: s = "abcabcbb"
输出: 3
解释: 因为无重复字符的最长子串是 "abc",所以其长度为 3。
示例 2:

输入: s = "bbbbb"
输出: 1
解释: 因为无重复字符的最长子串是 "b",所以其长度为 1。
示例 3:

输入: s = "pwwkew"
输出: 3
解释: 因为无重复字符的最长子串是 "wke",所以其长度为 3。
请注意,你的答案必须是 子串 的长度,"pwke" 是一个子序列,不是子串。

暴力解法

这个题最容易想到的还是暴力解法,既然要找最大的子串, 我就从头开始一个一个找。

固定子串的左边界,右边界往右移动,逐个往子串中添加字符,直到子串中已经存在字符,这时找到一个最大子串不重复的子串 记录长度;左边界右移一个字符,继续操作,不断替换最大值。

这里的时间复杂度是 O(n2)

1
2
3
4
5
6
7
8
9
10
11
12
13
14
15
16
17
18
19
// LenOfNonRepeatedSubstr 无重复子串的最大长度 1. 暴力之美
func LenOfNonRepeatedSubstr(str string) int {
maxStr := ""
cur := 0
maxLen := 0
for index := 0; index < len(str); index += 1 {
if strings.Index(maxStr, string(str[index])) != -1 { // 找到了, 回退并且置空
maxStr = ""
index = cur // 继续查找下一个位置开始的子串
cur = index + 1 // 记录当前子串的起始位置
} else { // 无重复 直接增加
maxStr += string(str[index])
if maxLen < len(maxStr) {
maxLen = len(maxStr)
}
}
}
return maxLen
}

####

回溯的位置待查找

暴力解法在于,每次都重新开始匹配下一个位置,没有利用上次匹配到的位置,假如abcac 匹配到第二个a的时候,要重新从b开始匹配。

实际并不需要,abc是无重复的,后面的a已经重复了,我们只需要在abc中找到 a 重复的位置,把他之前的子串去掉,继续往后匹配.

比如abc 匹配到 a的时候 重复了,bca不重复继续往后匹配。时间复杂度 O(N)

1
2
3
4
5
6
7
8
9
10
11
12
13
14
15
16
17
18
19
20
21
22
23
24
25
// LenOfNonRepeatedSubstrV1 无重复子串的最大长度 利用已经比较的最大子串
func LenOfNonRepeatedSubstrV1(str string) int {
maxStr := ""
maxLen := 0
for index := 0; index < len(str); index += 1 {
for strings.Index(maxStr, string(str[index])) != -1 { // 找到了,去掉最左边的字符,继续查找
// i..j 如果是最大不重复的,那么i+1...j 不可能是最大的
// 直接将左边的去掉 看j+1是否在子串 逐个去掉左边的字符
maxStr = maxStr[1:] // 去掉最左边的字符
continue
}
// 以上for循环可等价于
// pos := strings.Index(maxStr, string(str[index]))
// if pos != -1 {
// maxStr = maxStr[pos+1:]
// }

// j+1不在子串了
maxStr += string(str[index])
if maxLen < len(maxStr) {
maxLen = len(maxStr)
}
}
return maxLen
}

这个在匹配的时候 还是会遍历查找maxStr 中是否包含字符,这里做个改进

1
2
3
4
5
6
7
8
9
10
11
12
13
14
15
16
17
18
19
20
21
22
// LenOfNonRepeatedSubstrV2 无重复子串的最大长度 利用已经比较的最大子串
func LenOfNonRepeatedSubstrV2(str string) int {
maxLen := 0
strMap := make(map[byte]struct{})
rk := -1 // 初始化 rk 为左边的
for index := 0; index < len(str); index += 1 {
if index != 0 {
delete(strMap, str[index-1]) // 存在重复的 就去掉左边
}

for rk+1 < len(str) {
if _, ok := strMap[str[rk+1]]; !ok { // 不重复就放入 并且指针后移
strMap[str[rk+1]] = struct{}{}
rk += 1
} else {
break
}
}
maxLen = max(maxLen, rk-index+1)
}
return maxLen
}

这里只是把字符串换成了 map,查找的时候不用遍历.

后来看别人总结,才发现 这个方法叫做 滑动窗口,维护一个窗口,上面的代码实现 就是 maxStr 或者strMap 窗口中出现过的字符,就逐步缩小左边窗口,之后继续扩大右边窗口。

不管叫什么字符串匹配 优化方法 都是从已经匹配的子串中,继续往后操作,就是利用前面的匹配,不能每次都重新开始。

一晚上一个算法, 真是衰🐶。

Leetcode之三数之和

题目

1
2
3
4
5
给你一个整数数组 nums ,判断是否存在三元组 [nums[i], nums[j], nums[k]] 满足 i != j、i != k 且 j != k ,同时还满足 nums[i] + nums[j] + nums[k] == 0 。请

你返回所有和为 0 且不重复的三元组。

注意:答案中不可以包含重复的三元组。

示例:

1
2
3
4
5
6
7
8
9
10
11
12
13
14
15
16
17
18
19
20
21
22
23
24
25
26
27
示例 1:
输入:nums = [-1,0,1,2,-1,-4]
输出:[[-1,-1,2],[-1,0,1]]
解释:
nums[0] + nums[1] + nums[2] = (-1) + 0 + 1 = 0 。
nums[1] + nums[2] + nums[4] = 0 + 1 + (-1) = 0 。
nums[0] + nums[3] + nums[4] = (-1) + 2 + (-1) = 0 。
不同的三元组是 [-1,0,1] 和 [-1,-1,2] 。
注意,输出的顺序和三元组的顺序并不重要。


示例 2:

输入:nums = [0,1,1]
输出:[]
解释:唯一可能的三元组和不为 0 。
示例 3:

输入:nums = [0,0,0]
输出:[[0,0,0]]
解释:唯一可能的三元组和为 0 。


提示:

3 <= nums.length <= 3000
-105 <= nums[i] <= 105

暴力解法

最简单的往往都是暴力解法,三个数 就三重循环, 比较简单,直接上代码

三重循环时间复杂度是 O(N3)

1
2
3
4
5
6
7
8
9
10
11
12
13
14
15
16
17
18
19
20
21
22
23
24
25
26
27
28
29
30
31
32
33
34
35
36
37
// ThreeNumsBaoli 暴力之美
func ThreeNumsBaoli(nums []int) [][]int {
res := make([][]int, 0)
repMap := make(map[string]struct{})
for index := 0; index < len(nums); index += 1 { // 固定第一个数
for j := index + 1; j < len(nums); j += 1 { // 固定第二个不重复的数
for k := j + 1; k < len(nums); k += 1 { // 第三个不重复的数
if nums[index]+nums[j]+nums[k] == 0 {
unVal := getUniqueVal([3]int{nums[index], nums[j], nums[k]})
if _, ok := repMap[unVal]; ok {
continue
}
repMap[unVal] = struct{}{}
res = append(res, []int{nums[index], nums[j], nums[k]})
}
}
}
}

return res
}

func getUniqueVal(nums [3]int) string { // 这里是为了去重复
for index := 1; index < len(nums); index += 1 {
t := nums[index]
j := index - 1
for ; j >= 0; j-- {
if nums[j] < t {
break
}
nums[j+1] = nums[j]
}
// 插入j后面
nums[j+1] = t
}
return fmt.Sprintf("%d,%d,%d", nums[0], nums[1], nums[2])
}

双指针法

这里既然三个数之和为0, 要么三个数都是0, 必须有一个负数,这里是不是可以考虑先将数组排序,固定一个数, 该数后面使用,头尾双指针,将三个指针位置的数相加,如果小于0, 那将左边的指针右移,这里为啥? 直接就右移,因为数组有序,右边指针已经是最大的数了,只能增加最小的数,才可能等于0。应该很好理解。

1
2
3
4
5
6
7
8
9
10
11
12
13
14
15
16
17
18
19
20
21
22
23
24
25
26
27
28
29
30
func ThreeNumRep(nums []int) [][]int {
sort.Ints(nums)
res := make([][]int, 0)
for index := 0; index < len(nums) && nums[index] <= 0; index += 1 { // 固定第一个数
if index > 0 && nums[index] == nums[index-1] { // 第一个数重复的忽略
continue
}

left, right := index+1, len(nums)-1
for left < right { // 后面两个数
s := nums[index] + nums[left] + nums[right]
if s > 0 {
right -= 1
} else if s < 0 {
left += 1
} else if s == 0 { // 等于0 要注意 1. 左右指针要都移动
res = append(res, []int{nums[index], nums[left], nums[right]})
left += 1
right -= 1 // 先移动 左右指针,避免出现下面两个条件都不满足的情况, 当时踩坑了,智商堪忧
for left < right && nums[left-1] == nums[left] { // 这里是把重复的数 直接忽略掉
left += 1
}
for left < right && nums[right+1] == nums[right] {
right -= 1
}
}
}
}
return res
}

代码实现的是思路,思路有了代码实现 还搞半天,这是编码能力的问题吗? 写过之后 再来看这个思路有,代码又要搞半天,我理解应该是见的少了。

数据库与缓存如何保持一致性

数据库与缓存如何保持一致

缓存是常用的优化数据查询慢的一种方法,数据库出现瓶颈的时候,我们会给服务加上一层缓存,如Redis,命中缓存就不用查询数据库了。减轻数据库压力,提高服务器性能。

数据一致性

引入缓存后,数据出现两份,在数据变更的时候,就需要考虑缓存与数据库的一致性。

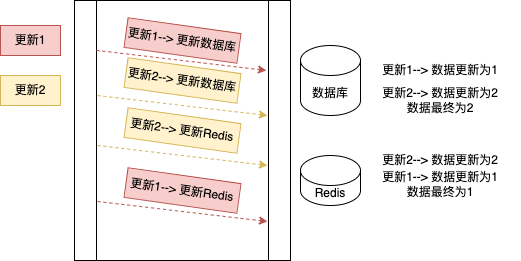
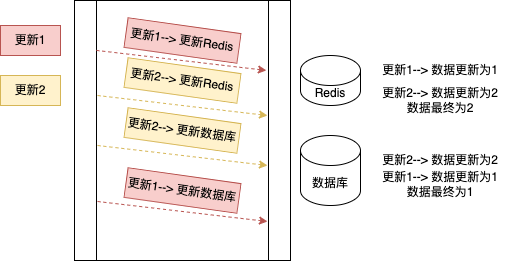
由于更新数据库与更新缓存操作 是两个步骤,在高并发的场景下,会出现什么问题呢? 我们来分析一下。

  • 先更新数据库

如下图所示,高并发场景下存在数据不一致。

img

  • 先更新缓存

同样也是会出现不一致的场景,如下图所示

img

所以,无论是先更新数据库还是更新redis,都会存在数据不一致的场景,由于单个操作不是原子操作(并发导致执行数据未知),也没有事物的支持(一个成功一个失败 导致数据不一致),高并发就会存在不可预知的顺序,导致结果与预期不一致。

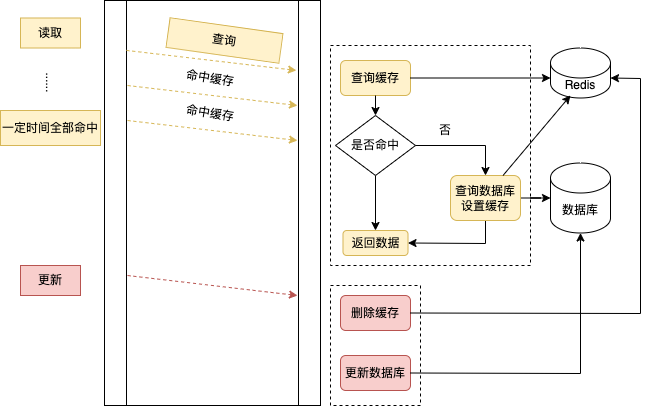
既然更新有问题,那缓存直接删除缓存呢?在更新的时候直接删除缓存,查询的时候 如果没有缓存就查库,并设置缓存.

如下图所示

img

读策略步骤

  1. 读取缓存,命中直接返回
  2. 未命中,读取数据库,并设置缓存

写策略步骤

  1. 删除缓存
  2. 更新数据库

读取的逻辑比较简单,先读缓存, 再读数据库,但写策略 删除缓存与更新数据库 这两个执行顺序 看似无关紧要,谁先谁后都不影响。我们具体分析一下。

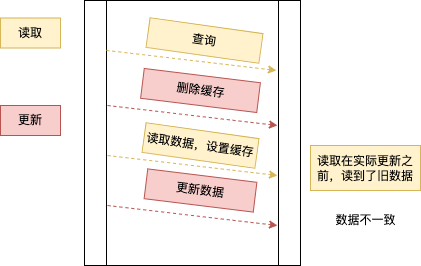
  • 先删除缓存

如下图所示,读请求来先查询数据,没查到,这个时候有个更新请求,先删除缓存,之后读请求开始读取数据(数据未更新 旧数据) 并将旧数据写入缓存。更新请求更新数据库为新的数据,这时候数据不一致。

img

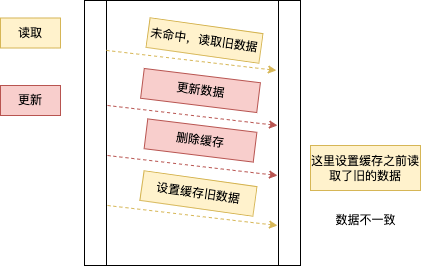
  • 先更新数据库

先删除缓存有可能出现不一致的场景,那先更新数据库呢?来跟着我的思路看一下。

img

同样,一个读请求与一个更新请求,读请求先检查缓存,没数据就从数据库读取数据(这时候还是旧的数据), 在写缓存之前, 更新请求更新了数据,并执行了清理缓存的操作,这个时候,读请求的设置缓存操作执行, 就出现了不一致。

问题的关键还是 非原子操作,无事务支持,导致并发出现未知的执行顺序。

  • 分布式锁

对于比较严格的场景,可以加分布式锁,将更新与删除缓存两步合为一步。也就是,数据更新可以加锁,等更新完成及缓存删除后释放锁,读请求也是加锁,发现有写锁 就等待,读锁就继续读。分布式读写锁可以解决并发导致的不一致问题。

  • 延迟双删

针对「先删除缓存,再更新数据库」可以用延迟双删的操作。更新请求在删除缓存后,等待一段时间,再进行一次缓存删除操作,就可以避免缓存中缓存旧数据。

常见问题

在面试的过程中,经常会假想,在操作缓存的时候,网络抖动导致缓存操作失败,这个时候很明显数据也是不一致的。

就比如,更新完数据库,删除缓存的时候失败了,怎么保证一致?

  • 重试

要保证强一致,只能多次删除,异步执行删除,失败后重试几次,一直失败可以增加告警机制配合。

也可以记录失败的key,下次读取的时候避开,总之 要保证强一致,大家应该有不少好的方法。

  • MySQL binlog订阅

比较高级的一种方案,或者说比较复杂,binlog推送数据变更记录,直接删除缓存。

不过,引入一种机制,就会导致系统越来越复杂,这个就看系统的取舍了。

控制协程(goroutine)的并发数量

1. 并发过高导致程序崩溃

先看一个简单的例子

1
2
3
4
5
6
7
8
9
10
11
12
func main() {
var wg sync.WaitGroup
for i := 0; i < math.MaxInt32; i++ {
wg.Add(1)
go func(i int) {
defer wg.Done()
fmt.Println(i)
time.Sleep(time.Second)
}(i)
}
wg.Wait()
}

这个例子要创建 math.MaxInt32个协程,每个协程只是输出当前的编号,正常情况下,会乱序输出 0 ~math.MaxInt32 的数字,但实际执行一段时间后 直接panic。

1
2
3
4
5
6
7
8
9
10
11
12
13
14
15
16
17
18
19
20
21
22
23
24
25
1298211
251117
1297752
panic: too many concurrent operations on a single file or socket (max 1048575)

goroutine 1300064 [running]:
internal/poll.(*fdMutex).rwlock(0xc000026120, 0x0?)
/usr/local/go/src/internal/poll/fd_mutex.go:147 +0x11b
internal/poll.(*FD).writeLock(...)
/usr/local/go/src/internal/poll/fd_mutex.go:239
internal/poll.(*FD).Write(0xc000026120, {0xc11b3ff928, 0x8, 0x8})
/usr/local/go/src/internal/poll/fd_unix.go:370 +0x72
os.(*File).write(...)
/usr/local/go/src/os/file_posix.go:48
os.(*File).Write(0xc000012018, {0xc11b3ff928?, 0x8, 0xc1255acf50?})
/usr/local/go/src/os/file.go:175 +0x65
fmt.Fprintln({0x10c6b88, 0xc000012018}, {0xc1255acf90, 0x1, 0x1})
/usr/local/go/src/fmt/print.go:285 +0x75
fmt.Println(...)
/usr/local/go/src/fmt/print.go:294
main.main.func1(0x0?)
/Users/shiguofu/Documents/hw.go:16 +0x8f
created by main.main
/Users/shiguofu/Documents/hw.go:14 +0x3c
panic: too many concurrent operations on a single file or socket (max 1048575)

报错信息也很明显,too many concurrent operations on a single file or socket

对单个 file/socket 的并发操作个数超过了系统最大值,这个错误是由于fmt.Sprintf引起的,它将格式化数据输出到标准输出。标准输出在linux系统中是文件描述符为1的文件,标准错误输出是2,标准输入是0。

总之就是系统资源耗尽了。

那假如去掉fmt这行输出呢?程序很可能就会因为内部不足而被迫退出,笔者尝试去掉跑出错误,电脑16G的,跑到5G多已经卡的不行, 就强行退出了。其实也好理解,每个协程约占用2K控件,1M个协程就是2G的内存,那Math.MaxInt 读者自己计算下。

2. 如何解决呢

2.1 利用channel的缓冲区大小来控制协程个数

1
2
3
4
5
6
7
8
9
10
11
12
13
14
15
func main() {
var wg sync.WaitGroup
ch := make(chan struct{}, 3)
for i := 0; i < 10; i++ {
ch <- struct{}{}
wg.Add(1)
go func(i int) {
defer wg.Done()
log.Println(i)
time.Sleep(time.Second)
<-ch
}(i)
}
wg.Wait()
}
  • make(chan struct{}, 3) 缓冲区大小为3,没有被消费的情况下,最多发送3个就被阻塞了
  • 开启协程前 往通道写入数据,缓冲区满 就阻塞了
  • 协程结束后 消费通道数据,缓冲区就可以继续写入数据,就可以再创建新的协程

如下进行封装,可直接像waitgroup一样使用

1
2
3
4
5
6
7
8
9
10
11
12
13
14
15
16
17
18
19
20
21
22
23
24
25
26
27
28
29
30
31
32
33
34
35
36
37
38
39
40
41
42
43
44
45
46
47
48
49
50
51
52
53

import (
"context"
"sync"
)

const defaultSize = 32

// SizeWaitGroup the struct control limit of waitgroup
type SizeWaitGroup struct {
buf chan struct{} // buffer to buf the current number of goroutines
wg sync.WaitGroup // the real wait group
}

// NewSizeWaitGroup wait group with limit
func NewSizeWaitGroup(size int) *SizeWaitGroup {
if size <= 0 {
size = defaultSize
}
return &SizeWaitGroup{
buf: make(chan struct{}, size),
wg: sync.WaitGroup{},
}
}

// Add
func (c *SizeWaitGroup) Add() {
_ = c.AddWithContext(context.Background())
}

// AddWithContext
// blocking if the number of goroutines has been reached
func (c *SizeWaitGroup) AddWithContext(ctx context.Context) error {
select {
case <-ctx.Done():
return ctx.Err()
case c.buf <- struct{}{}: // block
break
}
c.wg.Add(1)
return nil
}

// Done
func (c *SizeWaitGroup) Done() {
<-c.buf
c.wg.Done()
}

// Wait
func (c *SizeWaitGroup) Wait() {
c.wg.Wait()
}

2.2 调整系统资源上限

2.2.1 ulimit

有些场景下,即使我们有效地限制了协程的并发数量,但是仍旧出现了某一类资源不足的问题,例如:

  • too many open files
  • out of memory

操作系统通常会限制同时打开文件数量、栈空间大小等,ulimit -a 可以看到系统当前的设置:

1
2
3
4
5
6
7
8
9
10
11
12
13
14
15
16
core file size          (blocks, -c) 0
data seg size (kbytes, -d) unlimited
scheduling priority (-e) 0
file size (blocks, -f) unlimited
pending signals (-i) 63068
max locked memory (kbytes, -l) 64
max memory size (kbytes, -m) unlimited
open files (-n) 65535
pipe size (512 bytes, -p) 8
POSIX message queues (bytes, -q) 819200
real-time priority (-r) 0
stack size (kbytes, -s) 8192
cpu time (seconds, -t) unlimited
max user processes (-u) 63068
virtual memory (kbytes, -v) unlimited
file locks (-x) unlimited

我们可以使用 ulimit -n 999999,将同时打开的文件句柄数量调整为 999999 来解决这个问题,其他的参数也可以按需调整。

2.2.2 虚拟内存(virtual memory)

虚拟内存是一项非常常见的技术了,即在内存不足时,将磁盘映射为内存使用,比如 linux 下的交换分区(swap space)。

在linux创建交换分区

1
2
3
4
5
sudo fallocate -l 20G /mnt/.swapfile # 创建 20G 空文件
sudo mkswap /mnt/.swapfile # 转换为交换分区文件
sudo chmod 600 /mnt/.swapfile # 修改权限为 600
sudo swapon /mnt/.swapfile # 激活交换分区
free -m # 查看当前内存使用情况(包括交换分区)

关闭交换分区

1
2
sudo swapoff /mnt/.swapfile
rm -rf /mnt/.swapfile

磁盘的 I/O 读写性能和内存条相差是非常大的,例如 DDR3 的内存条读写速率很容易达到 20GB/s,但是 SSD 固态硬盘的读写性能通常只能达到 0.5GB/s,相差 40倍之多。因此,使用虚拟内存技术将硬盘映射为内存使用,显然会对性能产生一定的影响。如果应用程序只是在较短的时间内需要较大的内存,那么虚拟内存能够有效避免 out of memory 的问题。如果应用程序长期高频度读写大量内存,那么虚拟内存对性能的影响就比较明显了。

ES集群配置用户密码

ElastiSearch集群配置用户密码

ES集群配置启动成功后,默认是没有密码的,经常被内部扫出安全漏洞,存在数据泄漏及篡改的风险。

集群证书设置

启用了x-pack模块,那么集群中的各节点之间通讯就必须安全认证。为了解决节点间通讯的认证问,我们需要制作证书。

不然直接生成密码的话, 会报

1
Cause: Cluster state has not been recovered yet, cannot write to the [null]index
1
elasticsearch-certutil  cert

按照提示一步一步生成elastic-certificates.p12 文件。

elasticsearch.yml设置

1
2
3
4
5
6
7
xpack.security.enabled: true
xpack.security.transport.ssl.enabled: true
xpack.security.transport.ssl.keystore.type: PKCS12
xpack.security.transport.ssl.truststore.type: PKCS12
xpack.security.transport.ssl.verification_mode: certificate
xpack.security.transport.ssl.keystore.path: elastic-certificates.p12
xpack.security.transport.ssl.truststore.path: elastic-certificates.p12

将生成的证书放在es根目录的config文件夹下,如 elasticsearch/config/elastic-certificates.p12。

集群中每个节点都进行同样的配置,重启所有节点。

Elasticsearch 有两个级别的通信,传输通信和 http 通信。 传输协议用于 Elasticsearch 节点之间的内部通信,http 协议用于客户端到 Elasticsearch 集群的通信。
个人认为上面只设置了内部传输协议直接的证书,所以只用cert生成 ,没有ca生成。

elasticsearch.yml设置里面也只设置了 xpack.security.transport.ssl, 没有设置xpack.security.http.ssl…

开始设置密码

在任意节点中执行

1
elasticsearch-setup-passwords interactive

按照提示一步一步输入密码即可设置成功。

验证密码

ES验证当然是用curl测试

输入如下命令,账号密码替换为自己的,正确输出如下信息即设置成功。

1
2
3
4
5
curl localhost:9200/_cat/nodes --user elastic:xxxxx

10.10.x.x 17 99 0 0.06 0.09 0.12 xxxx * es-node3
10.10.x.x 35 99 0 0.06 0.09 0.12 xxxx - es-node2
10.10.x.x 40 99 0 0.06 0.09 0.12 xxxx - es-node1

ES修改密码

  1. 使用curl命令修改密码
1
2
3
4
5
curl -XPUT -u elastic:xxx http://localhost:9200/_xpack/security/user/elastic/_password -H 
"Content-Type: application/json" -d '
{
"password": "your passwd"
}'
  1. 密码忘记

进入es任意节点

1
2
3
4
5
6
/bin/elasticsearch-users useradd misspasswd -r superuser
Enter new password:
ERROR: Invalid password...passwords must be at least [6] characters long
[root@cfeeab4bb0eb elasticsearch]# ./bin/elasticsearch-users useradd misspasswd -r superuser
Enter new password:
Retype new password:

然后使用新建的用户执行1操作即可修改密码.

es docker-compose配置

https://github.com/shiguofu2012/scripts/blob/master/docker-compose/es.yml

运行准备:

  1. 创建目录,配置文件证书文件都是在宿主机器上的/root/data/es-7.5.1-{1,2,3}目录下
  2. 证书文件(证书生成见上文)/配置文件

配置文件1

1
2
3
4
5
6
7
8
9
10
11
12
13
14
15
16
17
18
19
20
21
22
23
cluster.name: test
node.name: es-node3
# network.bind_host: 0.0.0.0
network.host: 0.0.0.0
# network.publish_host: elasticsearch03
http.port: 9200
transport.tcp.port: 9300
http.cors.enabled: true
http.cors.allow-origin: "*"
node.master: true
node.data: true
cluster.initial_master_nodes: ["es-node1", "es-node2", "es-node3"]
# 加host
discovery.seed_hosts: ["elasticsearch01","elasticsearch03", "elasticsearch02"]


xpack.security.enabled: true
xpack.security.transport.ssl.enabled: true
xpack.security.transport.ssl.keystore.type: PKCS12
xpack.security.transport.ssl.truststore.type: PKCS12
xpack.security.transport.ssl.verification_mode: certificate
xpack.security.transport.ssl.keystore.path: elastic-certificates.p12
xpack.security.transport.ssl.truststore.path: elastic-certificates.p12
1
2
3
4
5
6
7
8
9
10
11
12
13
14
15
16
17
18
19
20
21
22
23
24
25
26
27
28
29
30
31
32
33
34
35
36
37
38
39
40
41
42
43
44
45
46
47
48
49
50
51
52
53
54
55
56
57
58
59
60
61
62
63
64
65
66
67
68
69
70
71
72
73
74
75
76
77
78
79
80
81
version: '2.2'
services:
elasticsearch01:
image: elasticsearch:7.10.1
container_name: es01
networks:
- shiguofu_net
# environment: 放入配置文件
# - discovery.type=single-node
# - xpack.security.enabled=true
# - xpack.license.self_generated.type=basic
# - xpack.security.transport.ssl.enabled=true
ports:
- 9200:9200
- 9201:9300
volumes:
- /root/data/es-7.5.1-1:/usr/share/elasticsearch/data
- /usr/local/jdk:/usr/share/elasticsearch/jdk
- /root/data/es-7.5.1-1/elastic-certificates.p12:/usr/share/elasticsearch/config/elastic-certificates.p12
- /root/data/es-7.5.1-1/es.yml:/usr/share/elasticsearch/config/elasticsearch.yml

elasticsearch02:
image: elasticsearch:7.10.1
container_name: es02
networks:
- shiguofu_net
# environment: 放入配置文件
# - discovery.type=single-node
# - xpack.security.enabled=true
# - xpack.license.self_generated.type=basic
# - xpack.security.transport.ssl.enabled=true
ports:
- 9300:9200
- 9301:9300
volumes:
- /usr/local/jdk:/usr/share/elasticsearch/jdk
- /root/data/es-7.5.1-2:/usr/share/elasticsearch/data
- /root/data/es-7.5.1-2/elastic-certificates.p12:/usr/share/elasticsearch/config/elastic-certificates.p12
- /root/data/es-7.5.1-2/es.yml:/usr/share/elasticsearch/config/elasticsearch.yml
elasticsearch03:
image: elasticsearch:7.10.1
container_name: es03
networks:
- shiguofu_net
# environment: 放入配置文件
# - discovery.type=single-node
# - xpack.security.enabled=true
# - xpack.license.self_generated.type=basic
# - xpack.security.transport.ssl.enabled=true
ports:
- 6666:9200
- 6667:9300
volumes:
- /root/data/es-7.5.1-3:/usr/share/elasticsearch/data
- /root/data/es-7.5.1-3/elastic-certificates.p12:/usr/share/elasticsearch/config/elastic-certificates.p12
- /usr/local/jdk:/usr/share/elasticsearch/jdk
- /root/data/es-7.5.1-3/es.yml:/usr/share/elasticsearch/config/elasticsearch.yml


kibana:
image: kibana:7.10.1
container_name: kibana
links:
- elasticsearch01
networks:
- shiguofu_net
environment:
- ELASTICSEARCH_HOSTS="http://elasticsearch01:9200"
- ELASTICSEARCH_USERNAME="elastic"
- ELASTICSEARCH_PASSWORD="aeQwQKM0N0nY"
depends_on:
- elasticsearch01
ports:
- 5601:5601

networks:
shiguofu_net:
driver: bridge
ipam:
config:
- subnet: 10.10.2.0/24

Nginx 负载均衡算法

nginx 内置变量

内置变量存放在 ngx_http_core_module 模块中,变量的命名方式和 apache 服务器变量是一致的。总而言之,这些变量代表着客户端请求头的内容,例如httpuseragent,http_cookie, 等等。

下面是 nginx 支持的所有内置变量:

$arg_name

这个变量是获取链接中参数名为 name 对应的值;
如请求链接: http://service.shiguofu.cn/test?name=100&a=200
argn​ame=′100′,arg_a = ‘200’

$args

这个变量获取链接中所有的参数,即链接问号后面的所有的东西;
如:http://service.shiguofu.cn/test?name=100&a=200
$args = ‘name=100&a=200’

$binary_remote_addr

客户端的二进制的 ip 地址;

$body_bytes_sent

传输给客户端的字节数,响应头不计算在内;

$bytes_sent

nginx 返回给客户端的字节数,包括响应头和响应体;

$connection

TCP 连接的序列号,并不是一次 http 请求就会更滑一个序列号,http 有 keep-alive 机制,一个序列号会维持

connection_requests

TCP 连接当前的请求数量,服务处理请求的个数,重启后重置为 0

$content_length

“Content-Length” 请求头字段, 客户端请求的头部中的 content-length 值;

$content_type

“Content-Type” 请求头字段

获取 cookie 名称为 name 的 cookie 值;
如 cookie:PHP_VERSION: 1.0; NAME:XIAOMING;….
$cookie_NAME = ‘XIAOMING

document_root

当前请求的文档根目录或别名,即配置文件中的 root 目录;

$document_uri

即请求的 uri;
如:http://service.shiguofu.cn/test/index?a=1
$document_uri = /test/index

$host

请求的 host, 优先级:HTTP 请求行的主机名 > 请求头中的”HOST”字段 > 符合请求的服务器名

$hostname

请求的服务主机名

$http_name

匹配任意请求头字段; 变量名中的后半部分“name”可以替换成任意请求头字段,如在配置文件中需要获取 http 请求头:“Accept-Language”,那么将“-”替换为下划线,大写字母替换为小写,形如:$http_accept_language 即可;

$https

如果开启了 SSL 安全模式,值为“on”,否则为空字符串;

$is_args

如果请求中有参数,值为“?”,否则为空字符串;

$msec

当前的 Unix 时间戳;

$nginx_version

nginx 版本;

$pid

nginx 进程 pid

$pipe

如果请求来自管道通信,值为“p”,否则为“.”

$proxy_protocol_addr

获取代理访问服务器的客户端地址,如果是直接访问,该值为空字符串。有些懵懂;

query_string

链接中的参数列表,同 $args;

$realpath_root

当前请求的文档根目录或别名的真实路径,会将所有符号连接转换为真实路径;

$remote_addr

客户端地址

$remote_port

客户端端口

$remote_user

用于 HTTP 基础认证服务的用户名;

#### $request

HTTP 请求的方法/路径及版本;
如: http://service.shiguofu.cn/test/index
$request = GET /test/index HTTP/1.1

$request_body

客户端的请求主体;post 中的 body 的数据部分

$request_completion

如果请求成功,值为”OK”,如果请求未完成或者请求不是一个范围请求的最后一部分,则为空;

request_filename

当前连接请求的文件路径,由 root 或 alias 指令与 URI 请求生成;

$request_length

请求的长度 (包括请求的地址, http 请求头和请求主体);

$request_method

HTTP 请求方法,通常为“GET”“POST”等

$request_time

处理客户端请求使用的时间; 从读取客户端的第一个字节开始计时;

$request_uri

客户端请求的 uri;
如:http://service.shiguofu.cn/test/index?a=1&b=200
$request_uri = /test/index?a=1&b=200

$scheme

请求使用的 Web 协议, “http” 或 “https”

$sent_http_name

设置任意 http 响应头字段; 变量名中的后半部分“name”可以替换成任意响应头字段,如需要设置响应头 Content-length,那么将“-”替换为下划线,大写字母替换为小写,形如:$sent_http_content_length 4096 即可;

$server_addr

服务器端地址;如 : 172.27.0.15

$server_name

服务器名;如 service.shiguofu.cn

$server_port

服务器端口号

$server_protocol

服务器的 HTTP 版本, 通常为 “HTTP/1.0” 或 “HTTP/1.1”

$status

HTTP 响应代码

tcpinfortt,tcpinfo_rttvar, tcpinfosndcwnd,tcpinfo_rcv_space

客户端 TCP 连接的具体信息

$time_iso8601

服务器时间的 ISO 8610 格式

$time_local

服务器时间(LOG Format 格式)

$uri

请求中的当前 URI(不带请求参数,参数位于 $args);

Nginx 负载均衡算法


Nginx 是一个高性能的 HTTP 和反向代理服务,因它的稳定性、丰富的功能集、示例配置文件和低系统资源的消耗而闻名。

其特点是占有内存少,并发能力强,事实上 nginx 的并发能力确实在同类型的网页服务器中表现较好,中国大陆使用 nginx 网站用户有:百度、京东、新浪、网易、腾讯、淘宝等。

当 Nginx 作为代理服务,后端可支持的应用也是多种类型的,比如基于 python 的 uwsgi、php 的 fastcgi 以及 TCP、HTTP、UDP 等协议;

1 配置 NGINX 代理后端应用

1.1 代理 uwsgi

1
2
3
4
5
6
7
8
9
10
11
12
upstream service {
server localhost:8888;
server 192.168.0.2:8889;
server example.shiguofu.cn:8899;
}

server {
location /app/service{
uwsgi_pass service;
include uwsgi_params; #uwsgi参数表,在/etc/nginx/目录
}
}

以上配置表示,主要使用 nginx 的指令 uwsgi_pass,使用 Nginx 的 uwsgi 模块将匹配到 location 的路径转发到有 upstream 块级指令代理的 uwsgi 服务,这里默认是轮询的方式;
所有的 uwsgi 服务在 upstream 中由 server 指令完成,server 指令接收 UNIX 套接字、IP 地址、FQDN 名及一些可选参数,参数下文会提及;

1.2 代理 HTTP

1
2
3
4
5
6
7
8
9
10
11
12
upstream service {
server localhost:8888;
server 192.168.0.2:8889;
server example.shiguofu.cn:8899;
}

server {
location /app/service{
proxy_pass http://service;
include proxy_params;
}
}

使用 Nginx 的 porxy_pass 指令,将匹配 location 的路径的请求转发到 upstream 块级指令代理的 HTTP 服务,同样采用轮询的方式;
所有的 HTTP 服务在 upstream 中由 server 指令完成,server 指令接收 UNIX 套接字、IP 地址、FQDN 名及一些可选参数,参数下文会提及;
不同的地方在于 proxy_pass 要加上 http,因为 upstream 并没有指定协议;

1.3 代理 fastcgi 协议

1
2
3
4
5
6
7
8
9
10
11
12
upstream service {
server localhost:8888;
server 192.168.0.2:8889;
server example.shiguofu.cn:8899;
}

server {
location /app/service{
fastcgi_pass http://service;
include fastcgi_params; #fastcgi参数表,在/etc/nginx/目录
}
}

使用 Nginx 的 fastcgi_pass 指令,将匹配 location 的路径的请求转发到 upstream 块级指令代理的 HTTP 服务,同样采用轮询的方式;
所有的 fastcgi 服务在 upstream 中由 server 指令完成,server 指令接收 UNIX 套接字、IP 地址、FQDN 名及一些可选参数,参数下文会提及;

1.4 代理 TCP

1
2
3
4
5
6
7
8
9
10
stream {
upstream mysql_backend{
server localhost:3306;
server mysql.shiguofu.cn:3306;
}
server{
listen 3307;
proxy_pass mysql_backend;
}
}

使用 Nginx 的 stream 块指令,它与 http 指令同一级别,写的时候要注意,在 ubuntu 系统中,http 块写在/etc/nginx/nginx.conf 中;因此笔者当时在/etc/nginx/nginx.conf 中添加的这段配置;

访问服务器的 3307 端口,测试 OK

root@VM-0-15-ubuntu:/etc/nginx# mysql -h 127.0.0.1 -P 3307 -uroot -p
Enter password:
Welcome to the MySQL monitor. Commands end with ; or \g.
Your MySQL connection id is 27868
Server version: 5.7.23-0ubuntu0.16.04.1-log (Ubuntu)

Copyright (c) 2000, 2018, Oracle and/or its affiliates. All rights reserved.

Oracle is a registered trademark of Oracle Corporation and/or its
affiliates. Other names may be trademarks of their respective
owners.

Type ‘help;’ or ‘\h’ for help. Type ‘\c’ to clear the current input statement.

mysql>

2 Nginx 负载均衡

Nginx 能够广泛使用,不仅是因为它可以作为代理服务,它还提供了适应于不同业务的负载均衡算法以及判断目标服务的可用性等强大的功能;

2.1 轮询算法

最简单的算法,也是 Nginx 默认的负载均衡算法;

1
2
3
4
5
6
7
8
9
10
11
12
upstream service {
server localhost:8888 weight=1 max_fails=3 fail_timeout=30;
server 192.168.0.2:8889 weight=2;
server tbk.shiguofu.cn:80 backup;
}

server {
location /app/service{
proxy_pass http://service;
include proxy_params;
}
}

以上配置是在轮询的基础上,增加了权重的配置,在上面示例中,Nginx 会将三个请求中的两个分发到 8889 端口对应的服务,将另一个请求分发到本地的 8888 端口的服务,并将将 tbk.shiguofu.cn 上的服务作为备用,当分发请求失败会启用备份服务;

  1. 使用 Nginx 的指令 weight 指令为轮询的 service 配置权重;
  2. max_fails 与 fail_timtou 为服务的高可用配置;表示在 30 秒内如果有 3 个失败的请求,则认为该服务已经宕掉,在这 30 秒结束之前不会有新的请求会发送到对应的服务上;等这 30 秒结束后,Nginx 会尝试发送一个新的请求到该服务,如果还是失败,则等待 30 秒…以此循环;

2.2 最少连接数

1
2
3
4
5
6
upstream service {
least_conn;
server localhost:8888;
server 192.168.0.2:8889;
server tbk.shiguofu.cn:80;
}

上面的 least_conn 指令为所负载的应用服务指定采用最少连接数负载均衡;
它会将访问请求分发到 upstream 所代理的服务中,当前打开连接数最少的应用服务器;它同时支持轮询中的 weight、max_fails、fail_timeout 选项,来决定给性能更好的应用服务器分配更多的访问请求;

2.3 最短响应时间

1
2
3
4
5
6
upstream service {
least_time;
server localhost:8888;
server 192.168.0.2:8889;
server tbk.shiguofu.cn:80;
}

该指令 least_time 仅仅在 NGINX PLUS 版本中支持,不多说。

2.4 散列算法

分为通用散列算法与 ip 散列算法;

1
2
3
4
5
6
upstream service {
hash $host;
server localhost:8888;
server 192.168.0.2:8889;
server tbk.shiguofu.cn:80;
}

通过 hash 指令实现,根据请求或运行时提供的文本、变量或者其他变量的组合生成散列值;
一般情况, 在需要对访问请求进行负载可控,或将访问请求负载到已经有数据缓存的应用服务的场景下,该算法会非常有用;
需要注意的是,在 upstream 中有应用服务的加入或者删除时,会重新计算散列值进行分发;

1
2
3
4
5
6
upstream service {
ip_hash;
server localhost:8888;
server 192.168.0.2:8889;
server tbk.shiguofu.cn:80;
}

指令 ip_hash 实现,通过计算客服端的 ip 地址来生成散列值。

Goroutine 在项目中的实践

Goroutine 在项目中的实践

Goroutine 是Golang语言的一大特色,Goroutine的出现,使得并发得到大幅提升。我们一起看下Goroutine在项目中的实践。

Goroutine并发控制

在业务开发中,会碰到几个相互独立的耗时操作,可以并行执行,这个时候Goroutine是很方便派上用场的。如下所示:

1
2
3
4
5
6
7
8
9
10
11
12
13
14
15
16
17
18
19
20
21
22
23
24
25
26
27
28
29
30
31
32
33
// someOperation your work to do
// if we have some data to return use channel to pass data
func someOperation() error {
time.Sleep(1 * time.Second)
return nil
}

// anotherOperation
// another work indenpendent with someOperation
func anotherOperation() error {
time.Sleep(1 * time.Second)
return nil
}

func bizFunc() error {
wg := sync.WaitGroup{} // sync.WatiGroup to sync goroutine
wg.Add(2) // we have 2 operation to do, so we add 2

go func() {
err := someOperation()
if err != nil {
// whatever handler
}
wg.Done()
}()

go func(){
err := anotherOperation()
wg.Done()
}()
wg.Wait() // wait all goroutine to return
// other operation depend on the two before
}

Gorotine 最大个数

上面的案例需要我们知道协程的数量,然后等待所有协程结束,那如果我们不确定协程的个数或者我们需要设置固定个数的协程,该如何做呢?

其实也很简单,利用channel的阻塞特性,创建一个固定长度的channel,创建一个协程,在channel中写入一条数据,当channel被填满后,就会阻塞;协程结束后,从channle中消费一条数据,协程就又可以写入数据,如此可固定协程的数量。

1
2
3
4
5
6
7
8
9
10
11
12
13
14
15
16
17
18
19
20
21
22
23
24
25
26
27
28
29
30
31
32
33
34
35
36
37
38
39
40
41
42
43
44
45
46
47
48
49
50
51
52
53
54
55
// wrapped for wait group

import (
"context"
"sync"
)

const defaultSize = 32

// SizeWaitGroup the struct control limit of waitgroup
type SizeWaitGroup struct {
buf chan struct{} // buffer to buf the current number of goroutines
wg sync.WaitGroup // the real wait group
}

// NewSizeWaitGroup wait group with limit
func NewSizeWaitGroup(size int) *SizeWaitGroup {
if size <= 0 {
size = defaultSize
}
return &SizeWaitGroup{
buf: make(chan struct{}, size), // init the size of channel
wg: sync.WaitGroup{},
}
}

// Add
func (c *SizeWaitGroup) Add() {
_ = c.AddWithContext(context.Background())
}

// AddWithContext
// blocking if the number of goroutines has been reached
func (c *SizeWaitGroup) AddWithContext(ctx context.Context) error {
//
select {
case <-ctx.Done(): // parent goroutines call canceled or timedout or other happend
return ctx.Err()
case c.buf <- struct{}{}: // block if channel is full
break
}
c.wg.Add(1) // we created a goroutine
return nil
}

// Done
func (c *SizeWaitGroup) Done() {
<-c.buf // a goroutine finished
c.wg.Done()
}

// Wait
func (c *SizeWaitGroup) Wait() {
c.wg.Wait()
}

如上代码所示,创建一个固定长度的channel,添加协程之前先往队列里增加一个占位符(struct{} 结构不占用内存,协程数量大时不会太占用内存),然后再调用真正的WaitGroup增加协程控制,执行完成后调用Done方法,从队列中取出占位符调用真正的WaitGroup的Done函数。

调用如下:

1
2
3
4
5
6
7
8
9
10
swg := NewSizeWaitGroup(128)
for index := 0; index < 1000; index += 1 {
swg.Add()
go func() {
// do what you want
swg.Done()
}
}

swg.Wait()

这样,协程的最大数量会保持在128个。

总结

Golang提供的channel与Goroutine 提供很方便的通信与并发功能,在实际的业务开发中,可以很方便讲相互独立的功能并发处理,提高系统的吞吐量。

Mysql模糊查找

Mysql模糊查找

在业务开发过程中,经常会碰到需要搜索的需求;结合msyql在模糊搜索的时候,很明显会用到like语句,一般情况下,在数据量比较小的时候,按行检索的效率也不是很明显的低效,但当达到百万级,千万级数据量的时候,查询的效率低下是一回事,很可能把数据库拖垮,严重影响可用性。这个时候提高查询效率就显得很重要!

模糊查找

一般情况,我们在查找时候的写法(field肯定是已经建了索引):

1
SELECT `column` FROM `table` WHERE `field` like '%keyword%';

上面的语句用explain解释来看,SQL语句并未使用索引,而是全表扫描,数据量比较大的时候,这效率可想而知。

对比下面的写法:

1
SELECT `column` FROM `table` WHERE `field` like 'keyword%';

这样的写法用explain解释看到,SQL语句使用了索引,搜索的效率大大的提高了。

但是有的时候,我们在做功能需求的时候,并非要想查询的关键词都在开头,所以如果不是特别的要求,”keywork%”并不能适应所有的查找。

所以,我们需要另一种方法。

LOCATE(’substr’,str,start_pos)

Mysql提供LOCATE函数,该方法返回查询字符串在被查询字段下的索引。第一个参数为要查询的字符串,第二个为数据库中的字段名称,第三个代表从字段对应的值的第几个字符串开始查找.

例, 有如下表:

1
2
3
4
5
CREATE TABLE `meetings` (
`id` bigint(20) NOT NULL AUTO_INCREMENT,
`des` varchar(225) NOT NULL DEFAULT '',
PRIMARY KEY (`id`)
) ENGINE=InnoDB;

以下sql则查询des字段匹配“hello”的行数。这个“hello” 在des中的可以是开头,可以是结尾,也可以是中间,非常方便。

1
SELECT * from meetings where LOCATE('hello',`des`) > 0;

LOCTATE这个函数有第三个参数,是查找的起始位置,比如可以在上面的sql中加入:

1
SELECT * from meetings where LOCATE('hello',`des`, 5) > 0;

我们使用explain来检查执行是否命中索引,会发现对搜索的字段如果存在索引,确实可以命中。

1
2
3
4
5
6
7
8
9
10
11
12
13
14
15
mysql> explain SELECT * from meetings where LOCATE('hello',`des`) > 0\G
*************************** 1. row ***************************
id: 1
select_type: SIMPLE
table: meetings
partitions: NULL
type: index
possible_keys: NULL
key: des_meeting
key_len: 227
ref: NULL
rows: 3
filtered: 100.00
Extra: Using where; Using index
1 row in set, 1 warning (0.00 sec)

如上explain的输出语句,确实使用了索引。

POSITION(‘substr’ IN field)

position可以看做是locate的别名,功能跟locate一样。其实个人理解,position只是查找是否包含子串,不能指定位置开始。

1
SELECT * from meetings where POSITION('hello' in `des`);

INSTR(str,’substr’)

1
SELECT `column` FROM `table` WHERE INSTR(`field`, 'keyword' )>0

这个INSTR也是子串判断

FIND_IN_SET

FIND_IN_SET(str1,str2)

返回str2中str1所在的位置索引,其中str2必须以”,”分割开。

1
SELECT * FROM person WHERE FIND_IN_SET('apply',name);

name的内容是以逗号分隔的,如

1
apple,pear,orange

就可以使用FIND_IN_SET

1
select * from `table` where FIND_IN_SET('apple', name);

个人觉得这个主要是针对sql数组数据的查找; 数组数据以逗号分隔存储到一个字段,FIND_IN_SET可以快速找到包含数组元素的行。

总结

Mysql在进行模糊查找需要注意,前缀匹配的时候会用到索引,前后都模糊,则无法使用索引;

可以使用Mysql提供的函数来“曲线救国”来命中索引。