数据库与缓存如何保持一致性

数据库与缓存如何保持一致

缓存是常用的优化数据查询慢的一种方法,数据库出现瓶颈的时候,我们会给服务加上一层缓存,如Redis,命中缓存就不用查询数据库了。减轻数据库压力,提高服务器性能。

数据一致性

引入缓存后,数据出现两份,在数据变更的时候,就需要考虑缓存与数据库的一致性。

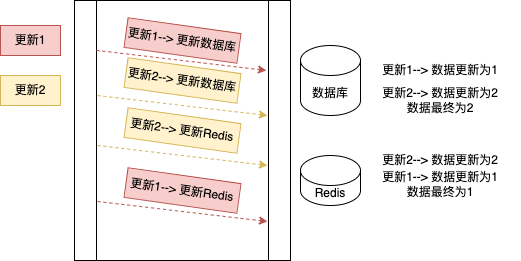
由于更新数据库与更新缓存操作 是两个步骤,在高并发的场景下,会出现什么问题呢? 我们来分析一下。

  • 先更新数据库

如下图所示,高并发场景下存在数据不一致。

img

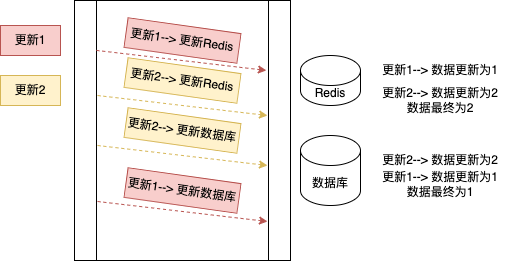
  • 先更新缓存

同样也是会出现不一致的场景,如下图所示

img

所以,无论是先更新数据库还是更新redis,都会存在数据不一致的场景,由于单个操作不是原子操作(并发导致执行数据未知),也没有事物的支持(一个成功一个失败 导致数据不一致),高并发就会存在不可预知的顺序,导致结果与预期不一致。

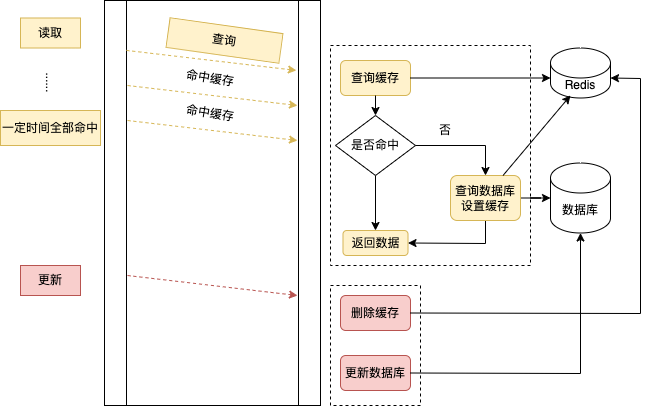
既然更新有问题,那缓存直接删除缓存呢?在更新的时候直接删除缓存,查询的时候 如果没有缓存就查库,并设置缓存.

如下图所示

img

读策略步骤

  1. 读取缓存,命中直接返回
  2. 未命中,读取数据库,并设置缓存

写策略步骤

  1. 删除缓存
  2. 更新数据库

读取的逻辑比较简单,先读缓存, 再读数据库,但写策略 删除缓存与更新数据库 这两个执行顺序 看似无关紧要,谁先谁后都不影响。我们具体分析一下。

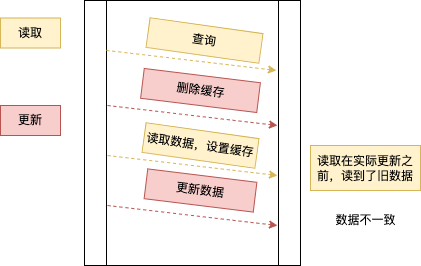
  • 先删除缓存

如下图所示,读请求来先查询数据,没查到,这个时候有个更新请求,先删除缓存,之后读请求开始读取数据(数据未更新 旧数据) 并将旧数据写入缓存。更新请求更新数据库为新的数据,这时候数据不一致。

img

  • 先更新数据库

先删除缓存有可能出现不一致的场景,那先更新数据库呢?来跟着我的思路看一下。

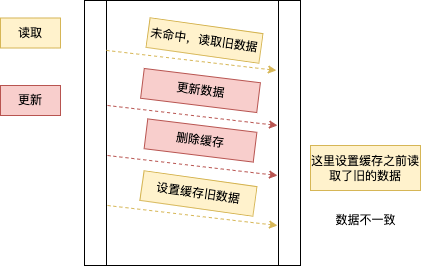
img

同样,一个读请求与一个更新请求,读请求先检查缓存,没数据就从数据库读取数据(这时候还是旧的数据), 在写缓存之前, 更新请求更新了数据,并执行了清理缓存的操作,这个时候,读请求的设置缓存操作执行, 就出现了不一致。

问题的关键还是 非原子操作,无事务支持,导致并发出现未知的执行顺序。

  • 分布式锁

对于比较严格的场景,可以加分布式锁,将更新与删除缓存两步合为一步。也就是,数据更新可以加锁,等更新完成及缓存删除后释放锁,读请求也是加锁,发现有写锁 就等待,读锁就继续读。分布式读写锁可以解决并发导致的不一致问题。

  • 延迟双删

针对「先删除缓存,再更新数据库」可以用延迟双删的操作。更新请求在删除缓存后,等待一段时间,再进行一次缓存删除操作,就可以避免缓存中缓存旧数据。

常见问题

在面试的过程中,经常会假想,在操作缓存的时候,网络抖动导致缓存操作失败,这个时候很明显数据也是不一致的。

就比如,更新完数据库,删除缓存的时候失败了,怎么保证一致?

  • 重试

要保证强一致,只能多次删除,异步执行删除,失败后重试几次,一直失败可以增加告警机制配合。

也可以记录失败的key,下次读取的时候避开,总之 要保证强一致,大家应该有不少好的方法。

  • MySQL binlog订阅

比较高级的一种方案,或者说比较复杂,binlog推送数据变更记录,直接删除缓存。

不过,引入一种机制,就会导致系统越来越复杂,这个就看系统的取舍了。

Nginx 负载均衡算法

nginx 内置变量

内置变量存放在 ngx_http_core_module 模块中,变量的命名方式和 apache 服务器变量是一致的。总而言之,这些变量代表着客户端请求头的内容,例如httpuseragent,http_cookie, 等等。

下面是 nginx 支持的所有内置变量:

$arg_name

这个变量是获取链接中参数名为 name 对应的值;
如请求链接: http://service.shiguofu.cn/test?name=100&a=200
argn​ame=′100′,arg_a = ‘200’

$args

这个变量获取链接中所有的参数,即链接问号后面的所有的东西;
如:http://service.shiguofu.cn/test?name=100&a=200
$args = ‘name=100&a=200’

$binary_remote_addr

客户端的二进制的 ip 地址;

$body_bytes_sent

传输给客户端的字节数,响应头不计算在内;

$bytes_sent

nginx 返回给客户端的字节数,包括响应头和响应体;

$connection

TCP 连接的序列号,并不是一次 http 请求就会更滑一个序列号,http 有 keep-alive 机制,一个序列号会维持

connection_requests

TCP 连接当前的请求数量,服务处理请求的个数,重启后重置为 0

$content_length

“Content-Length” 请求头字段, 客户端请求的头部中的 content-length 值;

$content_type

“Content-Type” 请求头字段

获取 cookie 名称为 name 的 cookie 值;
如 cookie:PHP_VERSION: 1.0; NAME:XIAOMING;….
$cookie_NAME = ‘XIAOMING

document_root

当前请求的文档根目录或别名,即配置文件中的 root 目录;

$document_uri

即请求的 uri;
如:http://service.shiguofu.cn/test/index?a=1
$document_uri = /test/index

$host

请求的 host, 优先级:HTTP 请求行的主机名 > 请求头中的”HOST”字段 > 符合请求的服务器名

$hostname

请求的服务主机名

$http_name

匹配任意请求头字段; 变量名中的后半部分“name”可以替换成任意请求头字段,如在配置文件中需要获取 http 请求头:“Accept-Language”,那么将“-”替换为下划线,大写字母替换为小写,形如:$http_accept_language 即可;

$https

如果开启了 SSL 安全模式,值为“on”,否则为空字符串;

$is_args

如果请求中有参数,值为“?”,否则为空字符串;

$msec

当前的 Unix 时间戳;

$nginx_version

nginx 版本;

$pid

nginx 进程 pid

$pipe

如果请求来自管道通信,值为“p”,否则为“.”

$proxy_protocol_addr

获取代理访问服务器的客户端地址,如果是直接访问,该值为空字符串。有些懵懂;

query_string

链接中的参数列表,同 $args;

$realpath_root

当前请求的文档根目录或别名的真实路径,会将所有符号连接转换为真实路径;

$remote_addr

客户端地址

$remote_port

客户端端口

$remote_user

用于 HTTP 基础认证服务的用户名;

#### $request

HTTP 请求的方法/路径及版本;
如: http://service.shiguofu.cn/test/index
$request = GET /test/index HTTP/1.1

$request_body

客户端的请求主体;post 中的 body 的数据部分

$request_completion

如果请求成功,值为”OK”,如果请求未完成或者请求不是一个范围请求的最后一部分,则为空;

request_filename

当前连接请求的文件路径,由 root 或 alias 指令与 URI 请求生成;

$request_length

请求的长度 (包括请求的地址, http 请求头和请求主体);

$request_method

HTTP 请求方法,通常为“GET”“POST”等

$request_time

处理客户端请求使用的时间; 从读取客户端的第一个字节开始计时;

$request_uri

客户端请求的 uri;
如:http://service.shiguofu.cn/test/index?a=1&b=200
$request_uri = /test/index?a=1&b=200

$scheme

请求使用的 Web 协议, “http” 或 “https”

$sent_http_name

设置任意 http 响应头字段; 变量名中的后半部分“name”可以替换成任意响应头字段,如需要设置响应头 Content-length,那么将“-”替换为下划线,大写字母替换为小写,形如:$sent_http_content_length 4096 即可;

$server_addr

服务器端地址;如 : 172.27.0.15

$server_name

服务器名;如 service.shiguofu.cn

$server_port

服务器端口号

$server_protocol

服务器的 HTTP 版本, 通常为 “HTTP/1.0” 或 “HTTP/1.1”

$status

HTTP 响应代码

tcpinfortt,tcpinfo_rttvar, tcpinfosndcwnd,tcpinfo_rcv_space

客户端 TCP 连接的具体信息

$time_iso8601

服务器时间的 ISO 8610 格式

$time_local

服务器时间(LOG Format 格式)

$uri

请求中的当前 URI(不带请求参数,参数位于 $args);

Nginx 负载均衡算法


Nginx 是一个高性能的 HTTP 和反向代理服务,因它的稳定性、丰富的功能集、示例配置文件和低系统资源的消耗而闻名。

其特点是占有内存少,并发能力强,事实上 nginx 的并发能力确实在同类型的网页服务器中表现较好,中国大陆使用 nginx 网站用户有:百度、京东、新浪、网易、腾讯、淘宝等。

当 Nginx 作为代理服务,后端可支持的应用也是多种类型的,比如基于 python 的 uwsgi、php 的 fastcgi 以及 TCP、HTTP、UDP 等协议;

1 配置 NGINX 代理后端应用

1.1 代理 uwsgi

1
2
3
4
5
6
7
8
9
10
11
12
upstream service {
server localhost:8888;
server 192.168.0.2:8889;
server example.shiguofu.cn:8899;
}

server {
location /app/service{
uwsgi_pass service;
include uwsgi_params; #uwsgi参数表,在/etc/nginx/目录
}
}

以上配置表示,主要使用 nginx 的指令 uwsgi_pass,使用 Nginx 的 uwsgi 模块将匹配到 location 的路径转发到有 upstream 块级指令代理的 uwsgi 服务,这里默认是轮询的方式;
所有的 uwsgi 服务在 upstream 中由 server 指令完成,server 指令接收 UNIX 套接字、IP 地址、FQDN 名及一些可选参数,参数下文会提及;

1.2 代理 HTTP

1
2
3
4
5
6
7
8
9
10
11
12
upstream service {
server localhost:8888;
server 192.168.0.2:8889;
server example.shiguofu.cn:8899;
}

server {
location /app/service{
proxy_pass http://service;
include proxy_params;
}
}

使用 Nginx 的 porxy_pass 指令,将匹配 location 的路径的请求转发到 upstream 块级指令代理的 HTTP 服务,同样采用轮询的方式;
所有的 HTTP 服务在 upstream 中由 server 指令完成,server 指令接收 UNIX 套接字、IP 地址、FQDN 名及一些可选参数,参数下文会提及;
不同的地方在于 proxy_pass 要加上 http,因为 upstream 并没有指定协议;

1.3 代理 fastcgi 协议

1
2
3
4
5
6
7
8
9
10
11
12
upstream service {
server localhost:8888;
server 192.168.0.2:8889;
server example.shiguofu.cn:8899;
}

server {
location /app/service{
fastcgi_pass http://service;
include fastcgi_params; #fastcgi参数表,在/etc/nginx/目录
}
}

使用 Nginx 的 fastcgi_pass 指令,将匹配 location 的路径的请求转发到 upstream 块级指令代理的 HTTP 服务,同样采用轮询的方式;
所有的 fastcgi 服务在 upstream 中由 server 指令完成,server 指令接收 UNIX 套接字、IP 地址、FQDN 名及一些可选参数,参数下文会提及;

1.4 代理 TCP

1
2
3
4
5
6
7
8
9
10
stream {
upstream mysql_backend{
server localhost:3306;
server mysql.shiguofu.cn:3306;
}
server{
listen 3307;
proxy_pass mysql_backend;
}
}

使用 Nginx 的 stream 块指令,它与 http 指令同一级别,写的时候要注意,在 ubuntu 系统中,http 块写在/etc/nginx/nginx.conf 中;因此笔者当时在/etc/nginx/nginx.conf 中添加的这段配置;

访问服务器的 3307 端口,测试 OK

root@VM-0-15-ubuntu:/etc/nginx# mysql -h 127.0.0.1 -P 3307 -uroot -p
Enter password:
Welcome to the MySQL monitor. Commands end with ; or \g.
Your MySQL connection id is 27868
Server version: 5.7.23-0ubuntu0.16.04.1-log (Ubuntu)

Copyright (c) 2000, 2018, Oracle and/or its affiliates. All rights reserved.

Oracle is a registered trademark of Oracle Corporation and/or its
affiliates. Other names may be trademarks of their respective
owners.

Type ‘help;’ or ‘\h’ for help. Type ‘\c’ to clear the current input statement.

mysql>

2 Nginx 负载均衡

Nginx 能够广泛使用,不仅是因为它可以作为代理服务,它还提供了适应于不同业务的负载均衡算法以及判断目标服务的可用性等强大的功能;

2.1 轮询算法

最简单的算法,也是 Nginx 默认的负载均衡算法;

1
2
3
4
5
6
7
8
9
10
11
12
upstream service {
server localhost:8888 weight=1 max_fails=3 fail_timeout=30;
server 192.168.0.2:8889 weight=2;
server tbk.shiguofu.cn:80 backup;
}

server {
location /app/service{
proxy_pass http://service;
include proxy_params;
}
}

以上配置是在轮询的基础上,增加了权重的配置,在上面示例中,Nginx 会将三个请求中的两个分发到 8889 端口对应的服务,将另一个请求分发到本地的 8888 端口的服务,并将将 tbk.shiguofu.cn 上的服务作为备用,当分发请求失败会启用备份服务;

  1. 使用 Nginx 的指令 weight 指令为轮询的 service 配置权重;
  2. max_fails 与 fail_timtou 为服务的高可用配置;表示在 30 秒内如果有 3 个失败的请求,则认为该服务已经宕掉,在这 30 秒结束之前不会有新的请求会发送到对应的服务上;等这 30 秒结束后,Nginx 会尝试发送一个新的请求到该服务,如果还是失败,则等待 30 秒…以此循环;

2.2 最少连接数

1
2
3
4
5
6
upstream service {
least_conn;
server localhost:8888;
server 192.168.0.2:8889;
server tbk.shiguofu.cn:80;
}

上面的 least_conn 指令为所负载的应用服务指定采用最少连接数负载均衡;
它会将访问请求分发到 upstream 所代理的服务中,当前打开连接数最少的应用服务器;它同时支持轮询中的 weight、max_fails、fail_timeout 选项,来决定给性能更好的应用服务器分配更多的访问请求;

2.3 最短响应时间

1
2
3
4
5
6
upstream service {
least_time;
server localhost:8888;
server 192.168.0.2:8889;
server tbk.shiguofu.cn:80;
}

该指令 least_time 仅仅在 NGINX PLUS 版本中支持,不多说。

2.4 散列算法

分为通用散列算法与 ip 散列算法;

1
2
3
4
5
6
upstream service {
hash $host;
server localhost:8888;
server 192.168.0.2:8889;
server tbk.shiguofu.cn:80;
}

通过 hash 指令实现,根据请求或运行时提供的文本、变量或者其他变量的组合生成散列值;
一般情况, 在需要对访问请求进行负载可控,或将访问请求负载到已经有数据缓存的应用服务的场景下,该算法会非常有用;
需要注意的是,在 upstream 中有应用服务的加入或者删除时,会重新计算散列值进行分发;

1
2
3
4
5
6
upstream service {
ip_hash;
server localhost:8888;
server 192.168.0.2:8889;
server tbk.shiguofu.cn:80;
}

指令 ip_hash 实现,通过计算客服端的 ip 地址来生成散列值。

Goroutine 在项目中的实践

Goroutine 在项目中的实践

Goroutine 是Golang语言的一大特色,Goroutine的出现,使得并发得到大幅提升。我们一起看下Goroutine在项目中的实践。

Goroutine并发控制

在业务开发中,会碰到几个相互独立的耗时操作,可以并行执行,这个时候Goroutine是很方便派上用场的。如下所示:

1
2
3
4
5
6
7
8
9
10
11
12
13
14
15
16
17
18
19
20
21
22
23
24
25
26
27
28
29
30
31
32
33
// someOperation your work to do
// if we have some data to return use channel to pass data
func someOperation() error {
time.Sleep(1 * time.Second)
return nil
}

// anotherOperation
// another work indenpendent with someOperation
func anotherOperation() error {
time.Sleep(1 * time.Second)
return nil
}

func bizFunc() error {
wg := sync.WaitGroup{} // sync.WatiGroup to sync goroutine
wg.Add(2) // we have 2 operation to do, so we add 2

go func() {
err := someOperation()
if err != nil {
// whatever handler
}
wg.Done()
}()

go func(){
err := anotherOperation()
wg.Done()
}()
wg.Wait() // wait all goroutine to return
// other operation depend on the two before
}

Gorotine 最大个数

上面的案例需要我们知道协程的数量,然后等待所有协程结束,那如果我们不确定协程的个数或者我们需要设置固定个数的协程,该如何做呢?

其实也很简单,利用channel的阻塞特性,创建一个固定长度的channel,创建一个协程,在channel中写入一条数据,当channel被填满后,就会阻塞;协程结束后,从channle中消费一条数据,协程就又可以写入数据,如此可固定协程的数量。

1
2
3
4
5
6
7
8
9
10
11
12
13
14
15
16
17
18
19
20
21
22
23
24
25
26
27
28
29
30
31
32
33
34
35
36
37
38
39
40
41
42
43
44
45
46
47
48
49
50
51
52
53
54
55
// wrapped for wait group

import (
"context"
"sync"
)

const defaultSize = 32

// SizeWaitGroup the struct control limit of waitgroup
type SizeWaitGroup struct {
buf chan struct{} // buffer to buf the current number of goroutines
wg sync.WaitGroup // the real wait group
}

// NewSizeWaitGroup wait group with limit
func NewSizeWaitGroup(size int) *SizeWaitGroup {
if size <= 0 {
size = defaultSize
}
return &SizeWaitGroup{
buf: make(chan struct{}, size), // init the size of channel
wg: sync.WaitGroup{},
}
}

// Add
func (c *SizeWaitGroup) Add() {
_ = c.AddWithContext(context.Background())
}

// AddWithContext
// blocking if the number of goroutines has been reached
func (c *SizeWaitGroup) AddWithContext(ctx context.Context) error {
//
select {
case <-ctx.Done(): // parent goroutines call canceled or timedout or other happend
return ctx.Err()
case c.buf <- struct{}{}: // block if channel is full
break
}
c.wg.Add(1) // we created a goroutine
return nil
}

// Done
func (c *SizeWaitGroup) Done() {
<-c.buf // a goroutine finished
c.wg.Done()
}

// Wait
func (c *SizeWaitGroup) Wait() {
c.wg.Wait()
}

如上代码所示,创建一个固定长度的channel,添加协程之前先往队列里增加一个占位符(struct{} 结构不占用内存,协程数量大时不会太占用内存),然后再调用真正的WaitGroup增加协程控制,执行完成后调用Done方法,从队列中取出占位符调用真正的WaitGroup的Done函数。

调用如下:

1
2
3
4
5
6
7
8
9
10
swg := NewSizeWaitGroup(128)
for index := 0; index < 1000; index += 1 {
swg.Add()
go func() {
// do what you want
swg.Done()
}
}

swg.Wait()

这样,协程的最大数量会保持在128个。

总结

Golang提供的channel与Goroutine 提供很方便的通信与并发功能,在实际的业务开发中,可以很方便讲相互独立的功能并发处理,提高系统的吞吐量。

Mysql模糊查找

Mysql模糊查找

在业务开发过程中,经常会碰到需要搜索的需求;结合msyql在模糊搜索的时候,很明显会用到like语句,一般情况下,在数据量比较小的时候,按行检索的效率也不是很明显的低效,但当达到百万级,千万级数据量的时候,查询的效率低下是一回事,很可能把数据库拖垮,严重影响可用性。这个时候提高查询效率就显得很重要!

模糊查找

一般情况,我们在查找时候的写法(field肯定是已经建了索引):

1
SELECT `column` FROM `table` WHERE `field` like '%keyword%';

上面的语句用explain解释来看,SQL语句并未使用索引,而是全表扫描,数据量比较大的时候,这效率可想而知。

对比下面的写法:

1
SELECT `column` FROM `table` WHERE `field` like 'keyword%';

这样的写法用explain解释看到,SQL语句使用了索引,搜索的效率大大的提高了。

但是有的时候,我们在做功能需求的时候,并非要想查询的关键词都在开头,所以如果不是特别的要求,”keywork%”并不能适应所有的查找。

所以,我们需要另一种方法。

LOCATE(’substr’,str,start_pos)

Mysql提供LOCATE函数,该方法返回查询字符串在被查询字段下的索引。第一个参数为要查询的字符串,第二个为数据库中的字段名称,第三个代表从字段对应的值的第几个字符串开始查找.

例, 有如下表:

1
2
3
4
5
CREATE TABLE `meetings` (
`id` bigint(20) NOT NULL AUTO_INCREMENT,
`des` varchar(225) NOT NULL DEFAULT '',
PRIMARY KEY (`id`)
) ENGINE=InnoDB;

以下sql则查询des字段匹配“hello”的行数。这个“hello” 在des中的可以是开头,可以是结尾,也可以是中间,非常方便。

1
SELECT * from meetings where LOCATE('hello',`des`) > 0;

LOCTATE这个函数有第三个参数,是查找的起始位置,比如可以在上面的sql中加入:

1
SELECT * from meetings where LOCATE('hello',`des`, 5) > 0;

我们使用explain来检查执行是否命中索引,会发现对搜索的字段如果存在索引,确实可以命中。

1
2
3
4
5
6
7
8
9
10
11
12
13
14
15
mysql> explain SELECT * from meetings where LOCATE('hello',`des`) > 0\G
*************************** 1. row ***************************
id: 1
select_type: SIMPLE
table: meetings
partitions: NULL
type: index
possible_keys: NULL
key: des_meeting
key_len: 227
ref: NULL
rows: 3
filtered: 100.00
Extra: Using where; Using index
1 row in set, 1 warning (0.00 sec)

如上explain的输出语句,确实使用了索引。

POSITION(‘substr’ IN field)

position可以看做是locate的别名,功能跟locate一样。其实个人理解,position只是查找是否包含子串,不能指定位置开始。

1
SELECT * from meetings where POSITION('hello' in `des`);

INSTR(str,’substr’)

1
SELECT `column` FROM `table` WHERE INSTR(`field`, 'keyword' )>0

这个INSTR也是子串判断

FIND_IN_SET

FIND_IN_SET(str1,str2)

返回str2中str1所在的位置索引,其中str2必须以”,”分割开。

1
SELECT * FROM person WHERE FIND_IN_SET('apply',name);

name的内容是以逗号分隔的,如

1
apple,pear,orange

就可以使用FIND_IN_SET

1
select * from `table` where FIND_IN_SET('apple', name);

个人觉得这个主要是针对sql数组数据的查找; 数组数据以逗号分隔存储到一个字段,FIND_IN_SET可以快速找到包含数组元素的行。

总结

Mysql在进行模糊查找需要注意,前缀匹配的时候会用到索引,前后都模糊,则无法使用索引;

可以使用Mysql提供的函数来“曲线救国”来命中索引。

Grpc拦截器

gRPC 拦截器

服务端拦截器

grpc接口服务端拦截器,一般用来做一些预处理及后处理操作。如下,举两个常用的例子。

  1. 在微服务之间使用gRPC互相调用的时候,会传入一些公共的与业务不相关的元数据,这些数据就很适合在拦截器中实现。

如下服务端的拦截器将gRPC client传入的数据放入gRPC的context中,接口中就可以使用ctx.Value去获取该数据。

1
2
3
4
5
6
7
8
9
10
11
12
13
14
15
16
17
18
19
20
21
22
23
24
25
26
27
28
29
30
31
32
// MetaDataInterceptor get grpc server info, requestId/traceId/LogId
func MetaServerDataInterceptor() grpc.UnaryServerInterceptor {
// 拦截器函数签名
// @params ctx Grpc context
// @params req grpc request
// @params info grpc request info
// @params handler the grpc method
return func(ctx context.Context,
req interface{},
info *grpc.UnaryServerInfo,
handler grpc.UnaryHandler) (resp interface{}, err error) {

// do what you want to do
// get metadata from grpc client
md, ok := metadata.FromIncomingContext(ctx)
if !ok {
md = metadata.Pairs()
}
// Set request info for context.
// define your key
for _, key := range []string{"requestId"} {
value := md.Get(key)
// ignore it if not exists.
if len(value) >= 1 {
// set value to context. you can use ctx.Value to get it from your grpc method
ctx = context.WithValue(ctx, key, value[0])
}
}
// next
return handler(ctx, req)
}
}
  1. 在实际的环境中,经常会需要在gRPC 接口之前之后做一些处理。比如,在开始之前记录时间,执行之后记录耗时操作;执行之后判断执行结果等等

如下所示,实现了一个记录接口耗时功能的拦截器,当然实际不会这么low。

1
2
3
4
5
6
7
8
9
10
11
12
13
14
15
16
17
// API time elas time get grpc server info
func APITimeInterceptor() grpc.UnaryServerInterceptor {
// 拦截器签名
return func(ctx context.Context,
req interface{},
info *grpc.UnaryServerInfo,
handler grpc.UnaryHandler) (resp interface{}, err error) {

// do what you want to do
start := time.Now().UnixNano()
// do gRPC method
ret := handler(ctx, req)
// do what you want after the grpc method
fmt.Println(time.Now().UnixNano() - start)
return ret
}
}

服务端流式接口拦截器

在golang的gRPC中,普通接口与stream接口的拦截器,需要分别实现。以上的拦截器只用于非stream的接口,对于stream接口,以上拦截器是不生效的。
流式拦截器函数签名如下:

1
type StreamServerInterceptor func(srv interface{}, ss ServerStream, info *StreamServerInfo, handler StreamHandler) error

查看流式拦截器可知,stream的context是在ServerStream中的,因此stream 要传递context 需要继承ServerStream并覆盖context。如下所示

1
2
3
4
5
6
7
8
9
10
11
12
13
14
15
16
17
18
19
20
// WrappedStream wraps around the embedded grpc.ServerStream, and intercepts the Context
type WrappedStream struct {
grpc.ServerStream // serverStream interface
Ctx *context.Context // 定义ctx,覆盖ServerStream中的context
}

// Context override the context method and can config the context manually
func (c WrappedStream) Context() context.Context {
return *c.Ctx
}

// NewWrappedStream wrapper the grpc.ServerStream
func NewWrappedStream(s grpc.ServerStream, ctx *context.Context) grpc.ServerStream {
wrapper := &WrappedStream{
ServerStream: s,
Ctx: ctx,
}
stream := grpc.ServerStream(wrapper)
return stream
}

实现该封装之后,就可以将上层的context获取并将元数据写入context后,调用NewWrappedStream传入gRPC的接口调用中。如下所示

  1. 流式拦截器实现元数据的传递
1
2
3
4
5
6
7
8
9
10
11
12
13
14
15
16
17
18
19
20
21
22
23
24
25
// stream method to get meta data
func MetaStreamServerInterceptor() grpc.StreamServerInterceptor {
// 函数签名
return func(
srv interface{}, ss grpc.ServerStream, info *grpc.StreamServerInfo, handler grpc.StreamHandler) error {
// 获取当前 grpc context
ctx := ss.Context()
md, ok := metadata.FromIncomingContext(ctx)
if !ok {
md = metadata.Pairs()
}
// Set request info for context.
// define your key
for _, key := range []string{"requestId"} {
value := md.Get(key)
// ignore it if not exists.
if len(value) >= 1 {
// set value to context. you can use ctx.Value to get it from your grpc method
ctx = context.WithValue(ctx, key, value[0])
}
}
// set context to next
return handler(srv, streaminterceptor.NewWrappedStream(ss, &ctx))
}
}

gRPC客户端拦截器

gRPC客户端拦截器是在调用gRPC接口之前与之后执行的操作。比如,元数据需要在请求接口之前塞入到metaData中(http2.0Header),才会传递到gRPC的服务端。
如下,将当前接口context中的数据放入header中传入服务端。

1
2
3
4
5
6
7
8
9
10
11
12
13
14
15
16
17
18
19
20
21
22
23
24
25
26
// request grpc service with requestId/traceId info.
func MetaClientDataInterceptor() grpc.UnaryClientInterceptor {
// 函数签名
return func(
ctx context.Context,
method string, req, resp interface{},
cc *grpc.ClientConn, invoker grpc.UnaryInvoker, opts ...grpc.CallOption,
) (err error) {
// 获取当前header数据,没有则新建一个
md, ok := metadata.FromOutgoingContext(ctx)
if !ok {
md = metadata.Pairs()
}
for _, key := range keyNames {
value := ctx.Value(key)
if strValue, ok := value.(string); ok && strValue != "" {

md.Set(key, strValue)
}
}
// 将header写入
ctx = metadata.NewOutgoingContext(ctx, md)
// 执行调用
return invoker(ctx, method, req, resp, cc, opts...)
}
}

流式客户端拦截器

Stream client的实现也是比较简单的,与服务端不同的是,客户端的流式拦截器不需要封装一层,可以直接使用。
如下,同样实现了元数据传递到服务端的拦截器。

1
2
3
4
5
6
7
8
9
10
11
12
13
14
15
16
17
18
19
20
21
22
23
24
25
// MetaStreamClientInterceptor get grpc client info, requestId/traceId/LogId for grpc stream server
func MetaStreamClientInterceptor() grpc.StreamClientInterceptor {
// 函数签名
return func(ctx context.Context, desc *grpc.StreamDesc, cc *grpc.ClientConn, method string, streamer grpc.Streamer,
opts ...grpc.CallOption) (grpc.ClientStream, error) {

// 从context获取元数据
md, ok := metadata.FromOutgoingContext(ctx)
if !ok {
md = metadata.Pairs()
}
for _, key := range keyNames {
value := ctx.Value(key)
if strValue, ok := value.(string); ok && strValue != "" {
md.Set(key, strValue)
}
}
// set metadata to ctx
ctx = metadata.NewOutgoingContext(ctx, md)

clientStream, err := streamer(ctx, desc, cc, method, opts...)

return clientStream, err
}
}

总结

拦截器为gRPC的服务端/客户端复用公共模块提供了一种很简单方便的方法,只需要实现对应的拦截器函数,在服务端启动或者客户端连接的时候作为选项传入即可(自行搜索)。
需要注意的是,在Golang中,拦截器分为普通接口与流式接口的拦截器,需要分别实现。

  1. 流式服务端拦截器

gRPC中拦截器流式接口拦截器需要实现如下签名的函数,有兴趣可深入了解下。例子如上所示

1
2
3
4
5
// StreamServerInterceptor provides a hook to intercept the execution of a streaming RPC on the server.
// info contains all the information of this RPC the interceptor can operate on. And handler is the
// service method implementation. It is the responsibility of the interceptor to invoke handler to
// complete the RPC.
func(srv interface{}, ss grpc.ServerStream, info *grpc.StreamServerInfo, handler grpc.StreamHandler) error

注意streamServer拦截器如果需要传递context,需要将ServerStream进行封装,覆盖Context 函数

  1. 普通服务端拦截器

普通方法的拦截器实现比较简单,实现如下签名函数

1
2
3
4
5
6
7
8
// @params ctx: grpc context
// @params req: the request params
// @params info: the grpc request info
// @params handler: the real grpc method
func(ctx context.Context,
req interface{},
info *grpc.UnaryServerInfo,
handler grpc.UnaryHandler) (resp interface{}, err error)
  1. 客户端普通拦截器

golang在调用grpc之前执行的公共的操作,比如要把requestId塞到header中。

1
2
3
4
5
6
7
8
9
10
11
// @params method: the RPC name
// @params req: the request
// @params resp: the response
// @params cc: the ClientConn on which the RPC was invoked
// @params invoker: the invoker of grpc methor
// @params opts: the option
func(
ctx context.Context,
method string, req, resp interface{},
cc *grpc.ClientConn, invoker grpc.UnaryInvoker, opts ...grpc.CallOption,
)
  1. 客户端流失拦截器

实现如下签名的函数即可

1
2
3
4
5
6
// @params desc: contains a description of the stream
// @params cc: the ClientConn on which the RPC was invoked
// @params method: the RPC name
// @params streamer: the handler to create a ClientStream and it is the responsibility of the interceptor to call it
// @params opts: the option
func(ctx context.Context, desc *StreamDesc, cc *ClientConn, method string, streamer Streamer, opts ...CallOption) (ClientStream, error)

以上即为Golang的拦截器实现,可以分为服务端与客户端的拦截器,两端分别有流式拦截器与普通接口拦截器,在使用的时候可根据自己的业务需求实现。

初识ElasticSearch

What is ElasticSearch

先搬一个官网的定义。

Elasticsearch is a real-time, distributed storage, search, and analytics engine

Elasticsearch 是一个实时分布式存储、搜索、分析的引擎。

要想了解它是什么,首先得看他能干什么,概念很清晰: 分布式存储/搜索/分析引擎。

  1. 看这些概念,咋一看,数据库也都可以做到。
  • 分布式存储 - 数据库也可以有主从集群模式
  • 搜索 - 数据库也可以用like %% 来查找

的确,这样做的确可以, mysql也支持全文检索。但是有个问题: like %% 是不走索引的,这就意味着: 数据量非常大的时候,我们的查询肯定是秒级的。

  1. 我还想提一个概念: 全文检索

类似搜索引擎,输入往往是多种多样的,不同的人有不同的表达方式,但实际 都是一个含义,数据库的准确性不高,效率低下,高并发下,数据库会被拖垮。

ElasticSearch 是专门做搜索的,就是为了在理解用户输入语义并高效搜索匹配度高的文档记录。

Elasticsearch基本概念

  • 近实时(NRT)

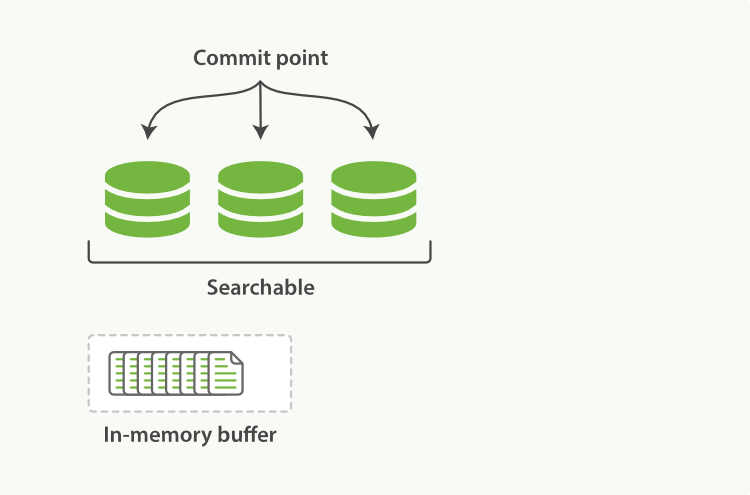
ElasticSearch是基于Lucene库的,Lucene数据只有刷新到磁盘,才可以被检索到,内存缓存中的数据只有刷新到磁盘才可以被检索。ElasticSearch默认是每秒刷新一次,也就是文档的变化会在一秒之后可见。因此近实时搜索。也可根据自己的需求设置刷新频率。

A Lucene index with new documents in the in-memory buffer

  • 集群(Cluster)

海量数据单机无法存储,就需要使用集群,将多个节点组织在一起,共同维护所有数据,共同提供索引和搜索功能。

  • 节点(node)

一个节点就是集群中的一个服务器,存储部分数据,参与索引与搜索。

  • 分片(shards & replicas)

一个索引可以存储超出单个结点硬件限制的大量数据,为了解决这个问题,Elasticsearch提供了将索引划分成多份的能力,这些份就叫做分片。为保证单点故障,一个分片会保存不止一份,可分为一个主分片(primary shard)与多个*复制分片(replica shard) *,复制分片的数量可动态调整,复制分片也可用来提升系统 的读性能。

  • 文档(Document)

一个文档是一个可被索引的基础信息单元。文档以JSON(Javascript Object Notation)格式来表示。

  • 索引(index)

一个索引就是一个拥有几分相似特征的文档的集合。

  • 索引类型(type)

索引类型是在一个索引中,不同类型的数据类型。一条文档中有(type)字段用来区分索引类型,es7.x以上取消同一个索引中存在不同索引类型的数据,也就是说,(_type)字段固定,默认为_doc。

如下,在7.x之前的ES可以在一个索引中创建不同索引类型的数据:

1
curl -XPOST localhost:9200/indexname/typename -H 'Content-Type:application/json' -d '{"data": 1234}'

ElasticSearch RestFul API

ES对外提供RestFul API来读写集群,设置集群,获取集群状态操作。

集群状态API

  • 集群状态

    GET /_cluster/health

1
2
3
4
5
6
7
8
9
10
11
12
13
14
15
16
17
18
curl http://localhost:9200/_cluster/health --user xx:xxxx
{
"cluster_name" : "es",
"status" : "green",
"timed_out" : false,
"number_of_nodes" : 2,
"number_of_data_nodes" : 2,
"active_primary_shards" : 1216,
"active_shards" : 2432,
"relocating_shards" : 0,
"initializing_shards" : 0,
"unassigned_shards" : 0,
"delayed_unassigned_shards" : 0,
"number_of_pending_tasks" : 0,
"number_of_in_flight_fetch" : 0,
"task_max_waiting_in_queue_millis" : 0,
"active_shards_percent_as_number" : 100.0
}
  • 集群节点列表
1
2
3
4
5
curl http://localhost:9200/_cat/nodes?v --user xxx:xxxx
ip heap.percent ram.percent cpu load_1m load_5m load_15m node.role master name
9.135.145.82 25 92 0 0.10 0.13 0.21 cdfhilmrstw * es-node0
9.135.91.111 21 99 0 0.01 0.07 0.08 cdfhilmrstw - es-node1
9.135.170.150 48 36 2 0.38 0.33 0.26 cdfhilmrstw - es-node2
  • 集群健康状态

结果与_cluster/health一致

1
2
3
4
curl --user elastic:4j243cNvO1770iCs http://10.1.1.45:9200/_cat/health?v

epoch timestamp cluster status node.total node.data shards pri relo init unassign pending_tasks max_task_wait_time active_shards_percent
1620725415 09:30:15 es-nnx25yd7 green 11 8 4632 2316 0 0 0 0 - 100.0%
  • 节点分配资源状态
1
2
3
4
5
curl --user elastic:4j243cNvO1770iCs http://10.1.1.45:9200/_cat/allocation?v

shards disk.indices disk.used disk.avail disk.total disk.percent   host    ip     node
 9    38.8mb      9.1gb     8.6gb    17.7gb      51   192.168.2.114    192.168.2.114    node-1
 9    38.8mb      4.7gb     13gb    17.7gb      26    192.168.2.116    192.168.2.116    node-2

索引文档操作

  • 索引列表
1
curl http://localhost:9200/_cat/indices?pretty --user xx:xxxx
  • 查看索引的设置
1
curl http://localhost:9200/[index_name]/_settings
  • 查看索引映射
1
curl http://localhost:9200/[index_name]/_mapping  --user xx:xxx
  • 创建索引
1
2
3
4
5
6
7
curl -H "Content-Type: application/json" -XPUT localhost:9200/blogs -d '
{
"settings": {
"number_of_shards": 3, # 主分片
"number_of_replicas": 1 # 副本分片
}
}'
  1. 主分片在索引创建以后就固定了,不可更改,如要修改可重建索引,将数据reindex过去;
  2. 副本分片最大值是 n-1(n为节点个数),复制分片可随时修改个数
1
2
3
4
5
> curl -H "Content-Type: application/json" -XPUT localhost:9200/blogs/_settings -d '
> {
> "number_of_replicas": 2
> }'
>
  • reIndex操作
1
2
3
4
5
6
7
8
9
curl -H "Content-Type: application/json" -XPOST localhost:9200/_reindex -d '
{
"source": {
"index": "accesslog"
},
"dest": {
"index": "newlog"
}
}'
  • 删除索引
1
curl -H "Content-Type: application/json" -XDELETE localhost:9200/[indexname]

查询文档操作

1
POST http://localhost:9200/indexname/_search
  • 查看所有
1
curl -XPOST http://localhost:9200/indexname/_search -H "Content-Type:application/json" -d '{"query":{"match_all":{} } }'
  • 精确匹配(price=549的数据)
1
curl -XPOST http://localhost:9200/indexname/_search -H "Content-Type:application/json" -d '{"query":{"constant_score":{"filter":{"term":{"price":549} } } } }'
  • term query(title=”java”)
1
curl -XPOST http://localhost:9200/indexname/_search -H "Content-Type:application/json" -d '{"query":{"term":{"title":"java"} } }'
  • 分词查询
1
curl -XPOST http://localhost:9200/indexname/_search -H "Content-Type:application/json" -d '{"query":{"match":{"title":"Core Java"} } }'
  • 分词查询(全匹配)
1
2
curl -XPOST http://localhost:9200/indexname/_search -H "Content-Type:application/json" -d 
'{"query":{"match":{"title":{"query":"Core Java", "operator":"and"} } } }'

索引模板

  • dynamic template
1
2
3
4
5
6
7
8
9
10
"dynamic_templates": [
{
"my_template_name": {
... match conditions ...
"mapping": { ... } # match field use mappings
}
},
...
]
# The match conditions can include any of : match_mapping_type, match, match_pattern, unmatch, path_match, path_unmatch.
  1. match_mapping_type
1
2
3
4
5
6
7
8
9
10
11
12
13
14
15
16
17
18
19
20
21
22
23
24
25
26
27
28
29
30
31
32
put myIndex 
{
"mappings": {
"my_type": {
"dynamic_templates": [
{
"integers": { # template name
"match_mapping_type": "long", # all fileld value long type
"mapping": {
"type": "integer" # recognate it as integer
}
}
},
{
"string_not_analyzed": {
"match_mapping_type": "string", # match all string filed
"mapping": {
"type": "string",
"fields": {
"raw": {
"type": "string",
"index": "not_analyzed",
"ignore_above": 256
}
}
}
}
}
]
}
}
}
  1. match and unmatch

match和unmatch定义应用于filedname的pattern。

定义一个匹配所有以long_开头且不以_text结束的string类型的模板

1
2
3
4
5
6
7
8
9
10
11
12
13
14
15
16
17
18
19
PUT my_index
{
"mappings": {
"my_type": {
"dynamic_templates": [
{
"longs_as_strings": {
"match_mapping_type": "string",
"match": "long_*",
"unmatch": "*_text",
"mapping": {
"type": "long"
}
}
}
]
}
}
}
  • example
1
2
3
4
5
6
7
8
9
10
11
12
13
14
15
16
17
18
19
20
21
22
23
24
25
26
27
28
29
30
31
32
33
34
35
36
37
38
39
40
41
42
43
44
45
46
47
48
49
50
51
52
53
54
55
56
57
58
59
60
61
62
63
64
65
66
67
68
69
70
71
72
73
74
75
76
77
78
79
80
81
82
83
84
85
86
curl -XPOST http://10.1.1.12:9200/_template/default@template --user elastic:b6fBNAapGEcYz2dt -H "Content-Type:application/json" -d '{
"order" : 1,
"index_patterns" : [
"*"
],
"settings" : {
"index" : {
"max_result_window" : "65536",
"refresh_interval" : "30s",
"unassigned" : {
"node_left" : {
"delayed_timeout" : "5m"
}
},
"translog" : {
"sync_interval" : "5s",
"durability" : "async"
},
"number_of_replicas" : "1"
}
},
"mappings" : {
"dynamic_templates" : [
{
"message_full" : {
"mapping" : {
"type" : "text",
"fields" : {
"keyword" : {
"ignore_above" : 2048,
"type" : "keyword"
}
}
},
"match" : "message_full"
}
},
{
"msg" : {
"mapping" : {
"type" : "text",
"fields" : {
"keyword" : {
"ignore_above" : 2048,
"type" : "keyword"
}
}
},
"match_pattern": "regex",
"match" : "msg|pl_message|json"
}
},
{
"payload_data" : {
"mapping" : {
"type" : "text",
"fields" : {
"keyword" : {
"ignore_above" : 2048,
"type" : "keyword"
}
}
},
"match" : "*payload"
}
},
{
"message" : {
"mapping" : {
"type" : "text"
},
"match" : "message"
}
},
{
"strings" : {
"mapping" : {
"type" : "keyword"
},
"match_mapping_type" : "string"
}
}
]
},
"aliases" : { }
}'

快照

1
2
3
4
5
6
7
8
9
# register a snapshot repository
PUT /_snapshot/my_fs_backup
{
"type": "fs",
"settings": {
"location": "/opt/backup_es",
"compress": true
}
}

location:my_fs_backup_location 路径必须先在elasticsearch.yaml中配置path.repo

1
path.repo: /opt/backup_es
location Location of the snapshots. Mandatory.
compress Turns on compression of the snapshot files. Compression is applied only to metadata files (index mapping and settings). Data files are not compressed. Defaults to true.
chunk_size Big files can be broken down into chunks during snapshotting if needed. Specify the chunk size as a value and unit, for example: 1GB, 10MB, 5KB, 500B. Defaults to null (unlimited chunk size).
max_restore_bytes_per_sec Throttles per node restore rate. Defaults to 40mb per second.
max_snapshot_bytes_per_sec Throttles per node snapshot rate. Defaults to 40mb per second.
readonly Makes repository read-only. Defaults to false.

快照策略

SLM

elastic设置密码

elasticsearch.yml增加如下配置

1
2
3
xpack.security.enabled: true
xpack.license.self_generated.type: basic
xpack.security.transport.ssl.enabled: true

重新启动es, 执行

1
bin/elasticsearch-setup-passwords interactive

这里需要为4个用户分别设置密码,elastic, kibana, logstash_system,beats_system,交互输入密码。

修改密码:

1
curl -H "Content-Type:application/json" -XPOST -u elastic 'http://127.0.0.1:9200/_xpack/security/user/elastic/_password' -d '{ "password" : "123456" }'

索引选项

index.refresh_interval

数据索引后并不会马上搜索到,需要刷新后才能被搜索的,这个选项设置索引后多久会被搜索到。

index.translog

  • sync_interval
  • durability

Why yellow

  • 多数据节点故障
  • 为索引使用损坏的或红色的分区
  • 高 JVM 内存压力或 CPU 利用率
  • 磁盘空间不足

Fix yellow

  1. 列出未分配的分区
1
curl -XGET 'localhost:9200/_cat/shards?h=index,shard,prirep,state,unassigned.reason' | grep UNASSIGNED

输出:

1
2
3
4
xxxxx                             0 r UNASSIGNED INDEX_CREATED
yyyyy 0 r UNASSIGNED INDEX_CREATED
zzzzz 0 r UNASSIGNED INDEX_CREATED
rrrrr 0 r UNASSIGNED INDEX_CREATED

展示出所有未分配的分片的列表

  1. 检索为什么未分配
1
curl -XGET 'localhost:9200/_cluster/allocation/explain?pretty' -H 'Content-Type:application/json' -d'{"index": "xxxxx", "shard": 0, "primary":false}'

输出:(未记录输出)

会给出集群中所有节点不能分配的原因。

  1. 解决

如果是磁盘空间不足,删除不必要的索引。对于其他原因,可根据情况解决不能分配的原因。比如下面几个常见的原因。

a. cluster.max_shards_per_node默认为1000,节点分片已经达到最大。

b. 磁盘空间达到配置的阈值,比如磁盘已经达到80%,不会继续分配分片。

c. 分片设置的节点必须是hot节点。

可通过如下接口查看当前磁盘分配配置:

1
curl -XGET _cluster/settings?include_defaults=true&flat_settings=true&pretty

输出(输出太多截取一部分):

1
2
3
4
5
6
7
8
9
10
11
12
13
{
"persistent" : {
"cluster.routing.allocation.disk.watermark.flood_stage" : "95%",
"cluster.routing.allocation.disk.watermark.high" : "90%",
"cluster.routing.allocation.disk.watermark.low" : "85%"
},
"transient" : {
"cluster.max_shards_per_node" : "10000",
"cluster.routing.allocation.disk.watermark.flood_stage" : "95%",
"cluster.routing.allocation.disk.watermark.high" : "90%",
"cluster.routing.allocation.disk.watermark.low" : "85%"
},
.....

索引生存周期(ILM)

适用于单索引并不断增长,可设置ILM rollover,根据大小或者文档条数拆分.

对于按天索引,可配置删除阶段规则.

  1. 创建ILM策略(hot/warm/cold/delete)

  2. 创建索引模板,指定ILM的范围

  3. 创建rollover的索引,名称末尾要是数字,这样rollover就会+1, 如:carlshi-00001;配置is_write_index选项

  4. 原索引写入数据

For Example:

1
2
3
4
5
6
7
8
9
10
11
12
13
14
15
16
17
18
19
# 创建索引模板
PUT /_template/carl_template
{
"index_patterns": [ # 匹配的索引名称
"carl-*"
],
"settings": {
"refresh_interval": "30s",
"number_of_shards": "1",
"number_of_replicas": "0"
},
"mappings": { # mapping
"properties": {
"name": {
"type": "keyword"
}
}
}
}

创建索引:

1
2
3
4
5
6
7
8
9
# 创建第一个索引
PUT /carlshi-000001
{
"aliases": {
"carlshi-index": { # 索引alias,写入carlshi-index的都会写入carlshi-00001
"is_write_index": true
}
}
}

elasticsearch docker

直接运行elasticsearch,会自动拉去镜像并执行;

1
docker run -p 9200:9200 -p 9300:9300 -e "discovery.type=single-node" elasticsearch:7.5.1 -v /usr/share/elasticsearch/data:/usr/share/elasticsearch/data

运行成功后,执行curl,获取基本信息

1
2
3
4
5
6
7
8
9
10
11
12
13
14
15
16
17
18
curl localhost:9200
{
"name" : "be856c56d8bd",
"cluster_name" : "docker-cluster",
"cluster_uuid" : "bsnwunE2SnWcBIqoxbgnUw",
"version" : {
"number" : "7.5.1",
"build_flavor" : "default",
"build_type" : "docker",
"build_hash" : "3ae9ac9a93c95bd0cdc054951cf95d88e1e18d96",
"build_date" : "2019-12-16T22:57:37.835892Z",
"build_snapshot" : false,
"lucene_version" : "8.3.0",
"minimum_wire_compatibility_version" : "6.8.0",
"minimum_index_compatibility_version" : "6.0.0-beta1"
},
"tagline" : "You Know, for Search"
}

小结

ElasticSearch是一款强大的全文检索工具,他提供REST API使得使用ElasticSearch非常简单,对数据做了很强的高可用,也可根据自己的需求配置不同级别的高可用、高性能全文检索工具。

本篇主要讲解对ElasticSearch的常用模块做了简单的介绍,索引的基本属性基本操作(增删改查),动态索引模式模板,快照备份,索引生存周期;还记录了集群黄色的排查方向。以后逐步深入各个模块的配置甚至内部实现原理。

日志处理之logstash

Introduction

Logstash是一个开源数据收集引擎,具有实时管道功能。Logstash将来自不同数据源的数据统一搜集起来,并根据需求将数据标准化输出到你所选择的目的地。如下图所示。

img

Input/Filter/Output

Logstash可以从多个数据源获取数据,并对其进行处理、转换,最后将其发送到不同类型的“存储”

输入

采集各种样式、大小和来源的数据

分布式系统中,数据往往是以各种各样的形式(结构化、非结构话)存在于不同的节点中。Logstash 支持不同数据源的选择 ,日志、报表、数据库的内容等等。可以在同一时间从众多常用来源捕捉事件。

  • 文件类型
1
2
3
4
5
6
7
8
9
10
11
12
13
14
15
16
17
18
19
20
21
22
23
24
25
26
27
28
29
30
input{
file{
# path属性接受的参数是一个数组,其含义是标明需要读取的文件位置
path => [‘pathA’,‘pathB’]

# 表示多就去path路径下查看是够有新的文件产生。默认是15秒检查一次。
discover_interval => 15

# 排除那些文件,也就是不去读取那些文件
exclude => [‘fileName1’,‘fileNmae2’]

# 被监听的文件多久没更新后断开连接不在监听,默认是一个小时。
close_older => 3600

# 在每次检查文件列 表的时候, 如果一个文件的最后 修改时间 超过这个值, 就忽略这个文件。 默认一天。
ignore_older => 86400

# logstash 每隔多久检查一次被监听文件状态(是否有更新), 默认是 1 秒。
stat_interval => 1

#sincedb记录数据上一次的读取位置的一个index
sincedb_path => ’$HOME/. sincedb‘

#logstash 从什么 位置开始读取文件数据, 默认是结束位置 也可以设置为:beginning 从头开始
start_position => ‘beginning’

# 注意:这里需要提醒大家的是,如果你需要每次都从开始读取文件的话,只设置start_position => beginning是没有用的,你可以选择sincedb_path 定义为 /dev/null
}

}
  • 数据库类型
1
2
3
4
5
6
7
8
9
10
11
12
13
14
15
16
17
18
19
20
21
22
23
24
25
26
27
28
29
30
31
32
33
34
35
36
37
38
39
40
41
42
input{
jdbc{
# jdbc sql server 驱动,各个数据库都有对应的驱动,需自己下载
jdbc_driver_library => "/etc/logstash/driver.d/sqljdbc_2.0/enu/sqljdbc4.jar"
#jdbc class 不同数据库有不同的 class 配置
jdbc_driver_class => "com.microsoft.sqlserver.jdbc.SQLServerDriver"
#配置数据库连接 ip 和端口,以及数据库
jdbc_connection_string => "jdbc:sqlserver://xxxxxx:1433;databaseName=test_db"
#配置数据库用户名
jdbc_user =>
#配置数据库密码
jdbc_password =>

# 上面这些主要配置数据库java驱动,账号配置
# 定时器 多久执行一次SQL,默认是一分钟
# schedule => 分 时 天 月 年
# schedule => * 22 * * * 表示每天22点执行一次
schedule => "* * * * *"
# 是否清除 last_run_metadata_path 的记录,如果为真那么每次都相当于从头开始查询所有的数据库记录
clean_run => false
# 是否需要记录某个column 的值,如果 record_last_run 为真,可以自定义我们需要表的字段名称,
#此时该参数就要为 true. 否则默认 track 的是 timestamp 的值.
use_column_value => true
#如果 use_column_value 为真,需配置此参数. 这个参数就是数据库给出的一个字段名称。当然该字段必须是递增的,可以是 数据库的数据时间这类的
tracking_column => create_time
#是否记录上次执行结果, 如果为真,将会把上次执行到的 tracking_column 字段的值记录下来,保存到 last_run_metadata_path 指定的文件中
record_last_run => true
# 我们只需要在 SQL 语句中 WHERE MY_ID > :last_sql_value 即可. 其中 :last_sql_value 取得就是该文件中的值
last_run_metadata_path => "/etc/logstash/run_metadata.d/my_info"
# 是否将字段名称转小写。
# 这里有个小的提示,如果你之前就处理过一次数据,并且在Kibana中有对应的搜索需求的话,还是改为true,
# 因为默认是true,并且Kibana是大小写区分的。准确的说应该是ES大小写区分
lowercase_column_names => false
# 你的SQL的位置,当然,你的SQL也可以直接写在这里。
# statement => SELECT * FROM tabeName t WHERE t.creat_time > :last_sql_value
statement_filepath => "/etc/logstash/statement_file.d/my_info.sql"
# 数据类型,标明数据来源,es索引的时候可以建立不同的额索引
type => "my_info"
}
# 注意:外在的SQL文件就是一个文本文件就可以了,还有需要注意的是,一个jdbc{}插件就只能处理一个SQL语句,
# 如果你有多个SQL需要处理的话,只能在重新建立一个jdbc{}插件。
}
  • beats

主要是接受filebeats的数据导入

1
2
3
4
5
6
7
8
input {
beats {
# 接受数据端口
port => 5044
# 数据类型
type => "logs"
}
}

过滤器

实时解析和转换数据

数据从源传输到存储库的过程中,需要对不同的数据进行不同的存储,Logstash 过滤器能够解析每条记录,识别每条数据的字段内容,并将它们转换成自定义数据,以便进行处理分析计算。

Logstash 动态地转换和解析数据,支持各种格式或复杂度数据的解析:

  • 利用 Grok 从非结构化数据中派生出结构
  • 从 IP 地址破译出地理坐标
  • 将 PII 数据匿名化,完全排除敏感字段
  • 整体处理不受数据源、格式或架构的影响

输出

尽管 ES是logstash的常用输出方向,能够为我们的搜索和分析带来无限可能,但它并非唯一选择。

Logstash 提供众多输出选择,您可以将数据发送到您要指定的地方,并且能够灵活地解锁众多下游用例。

img

Install && config

  • 安装

安装比较简单,官网直接有现成的二进制包,下载地址: https://artifacts.elastic.co/downloads/logstash/logstash-7.10.1-linux-x86_64.tar.gz

安装也比较简单,解压设置path即可使用。

本人经常使用,就写了个安装elk的脚本,需要的可以拿去使用:https://github.com/shiguofu2012/scripts/blob/master/install_elk.sh。

  • 配置intput/output

Logstash配置有两个必需的元素,输入和输出,以及一个可选过滤器。输入插件从数据源那里消费数据,过滤器插件根据你的期望修改数据,输出插件将数据写入目的地。

img

  1. 接下来,允许Logstash最基本的管道,例如:
1
2
3
4
5
6
7
8
9
10
11
12
13
14
15
16
17
18
19
20
21
22
23
24
25
26
27
28
29
30
31
[root@VM-145-82-centos ~]# logstash -e 'input { stdin {} } output { stdout {} }'
Sending Logstash logs to /usr/local/logstash/logs which is now configured via log4j2.properties
[2021-01-07T22:15:40,409][INFO ][logstash.runner ] Starting Logstash {"logstash.version"=>"7.9.3", "jruby.version"=>"jruby 9.2.13.0 (2.5.7) 2020-08-03 9a89c94bcc Java HotSpot(TM) 64-Bit Server VM 25.261-b12 on 1.8.0_261-b12 +indy +jit [linux-x86_64]"}
[2021-01-07T22:15:40,803][WARN ][logstash.config.source.multilocal] Ignoring the 'pipelines.yml' file because modules or command line options are specified
[2021-01-07T22:15:42,097][INFO ][org.reflections.Reflections] Reflections took 39 ms to scan 1 urls, producing 22 keys and 45 values
[2021-01-07T22:15:43,158][INFO ][logstash.javapipeline ][main] Starting pipeline {:pipeline_id=>"main", "pipeline.workers"=>8, "pipeline.batch.size"=>125, "pipeline.batch.delay"=>50, "pipeline.max_inflight"=>1000, "pipeline.sources"=>["config string"], :thread=>"#<Thread:0x41654bea run>"}
[2021-01-07T22:15:43,809][INFO ][logstash.javapipeline ][main] Pipeline Java execution initialization time {"seconds"=>0.64}
[2021-01-07T22:15:43,866][INFO ][logstash.javapipeline ][main] Pipeline started {"pipeline.id"=>"main"}
The stdin plugin is now waiting for input:
[2021-01-07T22:15:43,914][INFO ][logstash.agent ] Pipelines running {:count=>1, :running_pipelines=>[:main], :non_running_pipelines=>[]}
[2021-01-07T22:15:44,235][INFO ][logstash.agent ] Successfully started Logstash API endpoint {:port=>9600}
{
"host" => "VM-145-82-centos",
"message" => "",
"@timestamp" => 2021-01-07T14:15:43.902Z,
"@version" => "1"
}
hello
{
"host" => "VM-145-82-centos",
"message" => "hello",
"@timestamp" => 2021-01-07T14:15:47.996Z,
"@version" => "1"
}

{
"host" => "VM-145-82-centos",
"message" => "",
"@timestamp" => 2021-01-07T14:15:50.766Z,
"@version" => "1"
}

从标准输入获取数据,输出到标准输出。

  1. input 从filebeat获取数据
1
2
3
4
5
6
7
8
9
10
11
12
13
14
15
input {
beats {
host => "0.0.0.0" # 默认是127.0.0.1 只能本级访问
port => 5044
}
}
# output 索引至es
output {
elasticsearch {
hosts => ["localhost:9200"] # es地址
user => "xxxx" # 用户名
password => "xxxx" # 密码
index => "test-ap-%{+YYYY.MM.dd}" # 建立的索引,这里默认每天建一个索引
}
}

总体来讲,input/output是比较容易配置的,关键是对数据进行格式化。

  • filter
正则匹配

grok 匹配非格式化字段,提取字段格式化数据,强大的文本解析工具,支持正则表达式

1
2
3
4
5
6
7
8
9
10
11
grok {
match => { "[message]" => "%{TIMESTAMP_ISO8601:_timestamp} %{LOGLEVEL:level} %{DATA:stack}" }
}
# 解析失败的处理
if "_grokparsefailure" in [tags] {
mutate {
rename => ["message", "msg"]
remove_field => ["tags"]
}
}
}
ip解析
1
2
3
4
5
6
filter {
geoip {
source => "ip"
fields => ["city_name", "timezone"] # 选择解析的字段
}
}

解析出来的数据:

1
2
3
4
5
6
7
8
9
10
11
12
13
14
15
16
17
18
19
20
21
22
23
{
"ip" => "183.60.92.253",
"@version" => "1",
"@timestamp" => "2014-08-07T10:32:55.610Z",
"host" => "raochenlindeMacBook-Air.local",
"geoip" => {
"ip" => "183.60.92.253",
"country_code2" => "CN",
"country_code3" => "CHN",
"country_name" => "China",
"continent_code" => "AS",
"region_name" => "30",
"city_name" => "Guangzhou",
"latitude" => 23.11670000000001,
"longitude" => 113.25,
"timezone" => "Asia/Chongqing",
"real_region_name" => "Guangdong",
"location" => [
[0] 113.25,
[1] 23.11670000000001
]
}
}
字段增删改
1
2
3
4
5
6
7
8
9
10
11
12
13
14
15
16
17
18
19
20
21
22
23
24
filter {
mutate {
remove_field => ["ecs", "input", "agent", "tags", "@version", "@metadata"] # 移除字段
rename => ["host", "my_host"] # 重命名
rename => ["kubernetes", "my_k8s"] # 重命名
remove_field => ["[host][mac]", "[my_host][containerized]", "[my_host][os]", "[my_host][id]", "[my_host][name]", "[my_host][architecture]"] # 移除字段,使用已经重命名的字段
add_field => { "mytype" => "type" } # 增加字段

update => { "sample" => "My new message" } # 更新字段内容,如果字段不存在,不会新建
replace => { "message" => "%{source_host}: My new message" } # 与 update 功能相同,区别在于如果字段不存在则会新建字段
convert => ["request_time", "float"] # 数据类型转换
uppercase => [ "fieldname" ] # 大写转换
lowercase => [ "fieldname" ]

# 提供正则表达式替换
gsub => [
# replace all forward slashes with underscore
"fieldname", "/", "_",
# replace backslashes, question marks, hashes, and minuses
# with a dot "."
"fieldname2", "[\\?#-]", "."
]
}
}
条件判断
1
2
3
4
5
6
7
8
9
10
11
12
13
14
filter {
# 条件判断,字段my_k8s是否存在; 并且日志路径匹配
if ![my_k8s] and [log][file][path] =~ "/data/project_log/[\w-]+/[\w-\\.]+.log" {
mutate {
split => ["[log][file][path]", "/"]
# split操作 /data/project_log/app1/app.log => ["", data, project_log, app1, app.log]
add_field => { "[kubernets][labels][app]" => "%{[log][file][path][3]}" }
}
}
# 字段操作放在mutate中
mutate {
remove_field => [ "log" ]
}
}
json
1
2
3
4
5
6
7
8
9
10
11
12
13
14
15
16
filter {
# 检查是否是json格式
if [message] =~ "^\{.*\}[\s\S]*$" {
json {
source => "[message]"
target => "jsoncontent"
}
# json 数据失败
if "_jsonparsefailure" in [tags] {
mutate {
rename => ["message", "msg"]
remove_field => ["tags"]
}
}
}
}

Example

这里介绍一个曾经搭建的ELK日志系统。

结构比较简单,kubetnets中filebeat damonSet方式运行,搜集所有container 标准输出的日志,并传入logstash中,logstash将数据导入elasticsearch。结构图如下所示:

image-20210111133718737

下面开始logstash的配置:

input比较简单,使用filebeat搜集日志,传入logstash

1
2
3
4
5
6
input {
beats {
host => "0.0.0.0"
port => 5044
}
}

output增加了几个条件判断,根据不同的字段日志类型,索引到不同的es索引中;如下所示

1
2
3
4
5
6
7
8
9
10
11
12
13
14
15
16
17
18
19
20
21
22
23
24
25
26
27
28
29
30
31
32
33
34
35
36
37
38
39
output {
# k8s app 索引到对应的app中
if ([kubernetes][labels][app]) {
if ([type] == "app") {
elasticsearch {
hosts => ["localhost:9200"]
index => "%{[kubernetes][labels][app]}-%{+YYYY.MM.dd}"
}
# 根据type区分索引
} else if ([type] == "user") {
elasticsearch {
hosts => ["localhost:9200"]
index => "%{[kubernetes][labels][app]}-[type]%{+YYYY.MM.dd}"
}
} else {
elasticsearch {
hosts => ["localhost:9200"]
index => "%{[kubernetes][labels][app]}-%{+YYYY.MM.dd}"
}
}

# 不存在k8s app字段
} else if ([type] == "user") {
elasticsearch {
hosts => ["localhost:9200"]
index => "default-%{+YYYY.MM.dd}"
}
} else if ([type] == "app") {
elasticsearch {
hosts => ["localhost:9200"]
index => "default-%{+YYYY.MM.dd}"
}
} else {
elasticsearch {
hosts => ["localhost:9200"]
index => "default-v1.0.0"
}
}
}

filter 配置,不同的日志格式,输出格式化的数据

1
2
3
4
5
6
7
8
9
10
11
12
13
14
15
16
17
18
19
20
21
22
23
24
25
26
27
28
29
30
31
32
33
34
35
36
37
38
39
40
41
42
43
44
45
46
47
48
49
50
51
52
53
54
55
56
57
58
59
60
61
62
63
64
65
66
67
68
69
70
71
72
73
74
75
76
77
78
79
80
81
82
83
84
85
86
87
88
89
90
91
92
93
94
95
96
97
98
99
100
101
102
103
104
105
106
107
108
109
110
111
filter {
mutate {
# 移除filebeat发送的多余字段
remove_field => ["ecs", "input", "agent", "tags", "@version", "@metadata"]
remove_field => ["[host][mac]", "[host][containerized]", "[host][os]", "[host][id]", "[host][name]", "[host][architecture]"]
}
if ![kubernetes] and [log][file][path] =~ "/data/app_log/[\w-]+/[\w\.-]+.log" {
mutate {
split => ["[log][file][path]", "/"]
add_field => { "[kubernetes][labels][app]" => "%{[log][file][path][3]}-host" }
}
}
mutate {
remove_field => [ "log" ]
}

if [message] =~ "^\{.*\}[\s\S]*$" {
# json格式处理
json {
source => "[message]"
}
if "_jsonparsefailure" in [tags] {
mutate {
rename => ["message", "msg"]
remove_field => ["tags"]
}
}

if ([time]) {
date {
match => ["time", "ISO8601", "UNIX", "UNIX_MS", "TAI64N"]
target => "@timestamp"
}

mutate {
remove_field => ["time"]
}
}

# docker 日志格式
if [log] =~ "^\{.*\}[\s\S]*$" {
json {
source => "[log]"
}

mutate {
remove_field => ["log"]
}

if ([start_time]) {
date {
match => ["start_time", "ISO8601", "UNIX", "UNIX_MS", "TAI64N"]
target => "start_time"
}
}

if ([app_start_time]) {
date {
match => ["app_start_time", "ISO8601", "UNIX", "UNIX_MS", "TAI64N"]
target => "app_start_time"
}
}

if ([end_time]) {
date {
match => ["end_time", "ISO8601", "UNIX", "UNIX_MS", "TAI64N"]
target => "end_time"
}
}

if ([timestamp]) {
date {
match => ["timestamp", "ISO8601", "UNIX", "UNIX_MS", "TAI64N"]
target => "@timestamp"
}
}
} else {
if ([timestamp]) {
date {
match => ["timestamp", "ISO8601", "UNIX", "UNIX_MS", "TAI64N"]
target => "@timestamp"
}
}
}
} else {
# 匹配日志格式
grok {
match => { "[message]" => "%{TIMESTAMP_ISO8601:_timestamp} %{LOGLEVEL:level} %{DATA:stack} - (?<message>(.|\r|\n|\t)*)" }
}
# 匹配格式失败处理
if "_grokparsefailure" in [tags] {
mutate {
rename => ["message", "msg"]
remove_field => ["tags"]
}
}
# 解析时间格式
date {
match => ["_timestamp", "ISO8601", "UNIX", "UNIX_MS", "TAI64N"]
target => "@timestamp"
}

mutate {
remove_field => ["_timestamp"]
}
}

mutate {
remove_field => ["message"]
}
}

总结

总之 ,logstash具备强大的功能,将不同数据源的数据经过清洗格式化,转化为结构化的数据,存储到不同的存储单元。

gRPC tracing

介绍

gRPC

gRPC是什么可以用官网的一句话来概括

A high-performance, open-source universal RPC framework

所谓RPC(remote procedure call 远程过程调用)框架实际是提供了一套机制,使得应用程序之间可以进行通信,而且也遵从server/client模型。使用的时候客户端调用server端提供的接口就像是调用本地的函数一样。如下图所示就是一个典型的RPC结构图。

img

gRPC vs. Restful API

既然是server/client模型,那么我们直接用restful api不是也可以满足吗,为什么还需要RPC呢?

gRPC和restful API都提供了一套通信机制,用于server/client模型通信,而且它们都使用http作为底层的传输协议(严格地说, gRPC使用的http2.0,而restful api则不一定)。不过gRPC还是有些特有的优势,如下:

  • gRPC可以通过protobuf来定义接口,从而可以有更加严格的接口约束条件。
  • 另外,通过protobuf可以将数据序列化为二进制编码,这会大幅减少需要传输的数据量,从而大幅提高性能。
  • gRPC可以方便地支持流式通信(理论上通过http2.0就可以使用streaming模式, 但是通常web服务的restful api似乎很少这么用,通常的流式数据应用如视频流,一般都会使用专门的协议如HLS,RTMP等,这些就不是我们通常web服务了,而是有专门的服务器应用。)

Tracing

微服务遍地都是,一个功能,一个接口都可能是一个微服务,微服务之间的调用混乱,无法追踪,很难找出瓶颈点,因此迫切需要一种方法来追踪服务之间的调用链路。

  • MetaData

Metadata 可以理解为一个 HTTP 请求的 Header(它的底层实现就是 HTTP/2 的 Header),用户可以通过访问和修改每个 gRPC Call 的 Metadata 来传递额外的信息:比如认证信息,比如用于追踪的 Request ID。

  • interceptor

Interceptor 有点类似于我们平时常用的 HTTP Middleware,不同的是它可以用在 Client 端和 Server 端。比如在收到请求之后输出日志,在请求出现错误的时候输出错误信息,比如获取请求中设置的 Request ID。

  • Golang实现
1
2
3
4
5
6
7
8
9
10
11
12
13
14
15
16
17
18
19
// UnaryInvoker is called by UnaryClientInterceptor to complete RPCs.
type UnaryInvoker func(ctx context.Context, method string, req, reply interface{}, cc *ClientConn, opts ...CallOption) error

// UnaryClientInterceptor intercepts the execution of a unary RPC on the client. invoker is the handler to complete the RPC
// and it is the responsibility of the interceptor to call it.
// This is an EXPERIMENTAL API.
type UnaryClientInterceptor func(ctx context.Context, method string, req, reply interface{}, cc *ClientConn, invoker UnaryInvoker, opts ...CallOption) error

// UnaryHandler defines the handler invoked by UnaryServerInterceptor to complete the normal
// execution of a unary RPC. If a UnaryHandler returns an error, it should be produced by the
// status package, or else gRPC will use codes.Unknown as the status code and err.Error() as
// the status message of the RPC.
type UnaryHandler func(ctx context.Context, req interface{}) (interface{}, error)

// UnaryServerInterceptor provides a hook to intercept the execution of a unary RPC on the server. info
// contains all the information of this RPC the interceptor can operate on. And handler is the wrapper
// of the service method implementation. It is the responsibility of the interceptor to invoke handler
// to complete the RPC.
type UnaryServerInterceptor func(ctx context.Context, req interface{}, info *UnaryServerInfo, handler UnaryHandler) (resp interface{}, err error)

Golang 的实现是把 Metadata 塞在了 context 里面,只需要使用 metadata.FromOutgoingContext(ctx)metadata.FromIncomingContext(ctx) 就能够访问本次请求的 Metadata。概念清楚之后代码应该非常好写了:

1
2
3
4
5
6
7
8
9
10
11
12
13
14
15
16
17
18
19
20
21
22
23
24
25
26
27
28
29
30
31
32
33
34
35
36
37
38
39
40
41
42
43
44
const requestIdKey = "requestId"

// client 请求RPC增加MetaData拦截器
func RequestIDClientInterceptor() grpc.UnaryClientInterceptor {
return func(
ctx context.Context,
method string, req, resp interface{},
cc *grpc.ClientConn, invoker grpc.UnaryInvoker, opts ...grpc.CallOption,
) (err error) {
// 获取请求的MetaData
md, ok := metadata.FromOutgoingContext(ctx)
if !ok {
// 未添加则创建
md = metadata.Pairs()
}

value := ctx.Value(requestIdKey)
if requestID, ok := value.(string); ok && requestID != "" {
// md 不区分大小写,内部会转换为小写
md.Set(requestIdKey, requestID)
}
return invoker(metadata.NewOutgoingContext(ctx, md), method, req, resp, cc, opts...)
}
}

// server端获取MetaData数据
func RequestIDServerInterceptor() grpc.UnaryServerInterceptor {
return func(
ctx context.Context,
req interface{}, info *grpc.UnaryServerInfo, handler grpc.UnaryHandler,
) (resp interface{}, err error) {
// 获取请求过来的MetaData
md, ok := metadata.FromIncomingContext(ctx)
if !ok {
md = metadata.Pairs()
}
// 后去请求的requstId,并设置到当前context中
requestIDs := md[requestIdKey]
if len(requestIDs) >= 1 {
ctx = context.WithValue(ctx, requestIdKey, requestIDs[0])
}
return handler(ctx, req)
}
}