// MetaDataInterceptor get grpc server info, requestId/traceId/LogId funcMetaServerDataInterceptor()grpc.UnaryServerInterceptor { // 拦截器函数签名 // @params ctx Grpc context // @params req grpc request // @params info grpc request info // @params handler the grpc method returnfunc(ctx context.Context, req interface{}, info *grpc.UnaryServerInfo, handler grpc.UnaryHandler)(resp interface{}, err error) { // do what you want to do // get metadata from grpc client md, ok := metadata.FromIncomingContext(ctx) if !ok { md = metadata.Pairs() } // Set request info for context. // define your key for _, key := range []string{"requestId"} { value := md.Get(key) // ignore it if not exists. iflen(value) >= 1 { // set value to context. you can use ctx.Value to get it from your grpc method ctx = context.WithValue(ctx, key, value[0]) } } // next return handler(ctx, req) } }
// API time elas time get grpc server info funcAPITimeInterceptor()grpc.UnaryServerInterceptor { // 拦截器签名 returnfunc(ctx context.Context, req interface{}, info *grpc.UnaryServerInfo, handler grpc.UnaryHandler)(resp interface{}, err error) { // do what you want to do start := time.Now().UnixNano() // do gRPC method ret := handler(ctx, req) // do what you want after the grpc method fmt.Println(time.Now().UnixNano() - start) return ret } }
// WrappedStream wraps around the embedded grpc.ServerStream, and intercepts the Context type WrappedStream struct { grpc.ServerStream // serverStream interface Ctx *context.Context // 定义ctx,覆盖ServerStream中的context }
// Context override the context method and can config the context manually func(c WrappedStream)Context()context.Context { return *c.Ctx }
// stream method to get meta data funcMetaStreamServerInterceptor()grpc.StreamServerInterceptor { // 函数签名 returnfunc( srv interface{}, ss grpc.ServerStream, info *grpc.StreamServerInfo, handler grpc.StreamHandler)error { // 获取当前 grpc context ctx := ss.Context() md, ok := metadata.FromIncomingContext(ctx) if !ok { md = metadata.Pairs() } // Set request info for context. // define your key for _, key := range []string{"requestId"} { value := md.Get(key) // ignore it if not exists. iflen(value) >= 1 { // set value to context. you can use ctx.Value to get it from your grpc method ctx = context.WithValue(ctx, key, value[0]) } } // set context to next return handler(srv, streaminterceptor.NewWrappedStream(ss, &ctx)) } }
// MetaStreamClientInterceptor get grpc client info, requestId/traceId/LogId for grpc stream server funcMetaStreamClientInterceptor()grpc.StreamClientInterceptor { // 函数签名 returnfunc(ctx context.Context, desc *grpc.StreamDesc, cc *grpc.ClientConn, method string, streamer grpc.Streamer, opts ...grpc.CallOption)(grpc.ClientStream, error) {
// 从context获取元数据 md, ok := metadata.FromOutgoingContext(ctx) if !ok { md = metadata.Pairs() } for _, key := range keyNames { value := ctx.Value(key) if strValue, ok := value.(string); ok && strValue != "" { md.Set(key, strValue) } } // set metadata to ctx ctx = metadata.NewOutgoingContext(ctx, md)
// StreamServerInterceptor provides a hook to intercept the execution of a streaming RPC on the server. // info contains all the information of this RPC the interceptor can operate on. And handler is the // service method implementation. It is the responsibility of the interceptor to invoke handler to // complete the RPC. func(srv interface{}, ss grpc.ServerStream, info *grpc.StreamServerInfo, handler grpc.StreamHandler)error
// @params ctx: grpc context // @params req: the request params // @params info: the grpc request info // @params handler: the real grpc method func(ctx context.Context, req interface{}, info *grpc.UnaryServerInfo, handler grpc.UnaryHandler)(resp interface{}, err error)
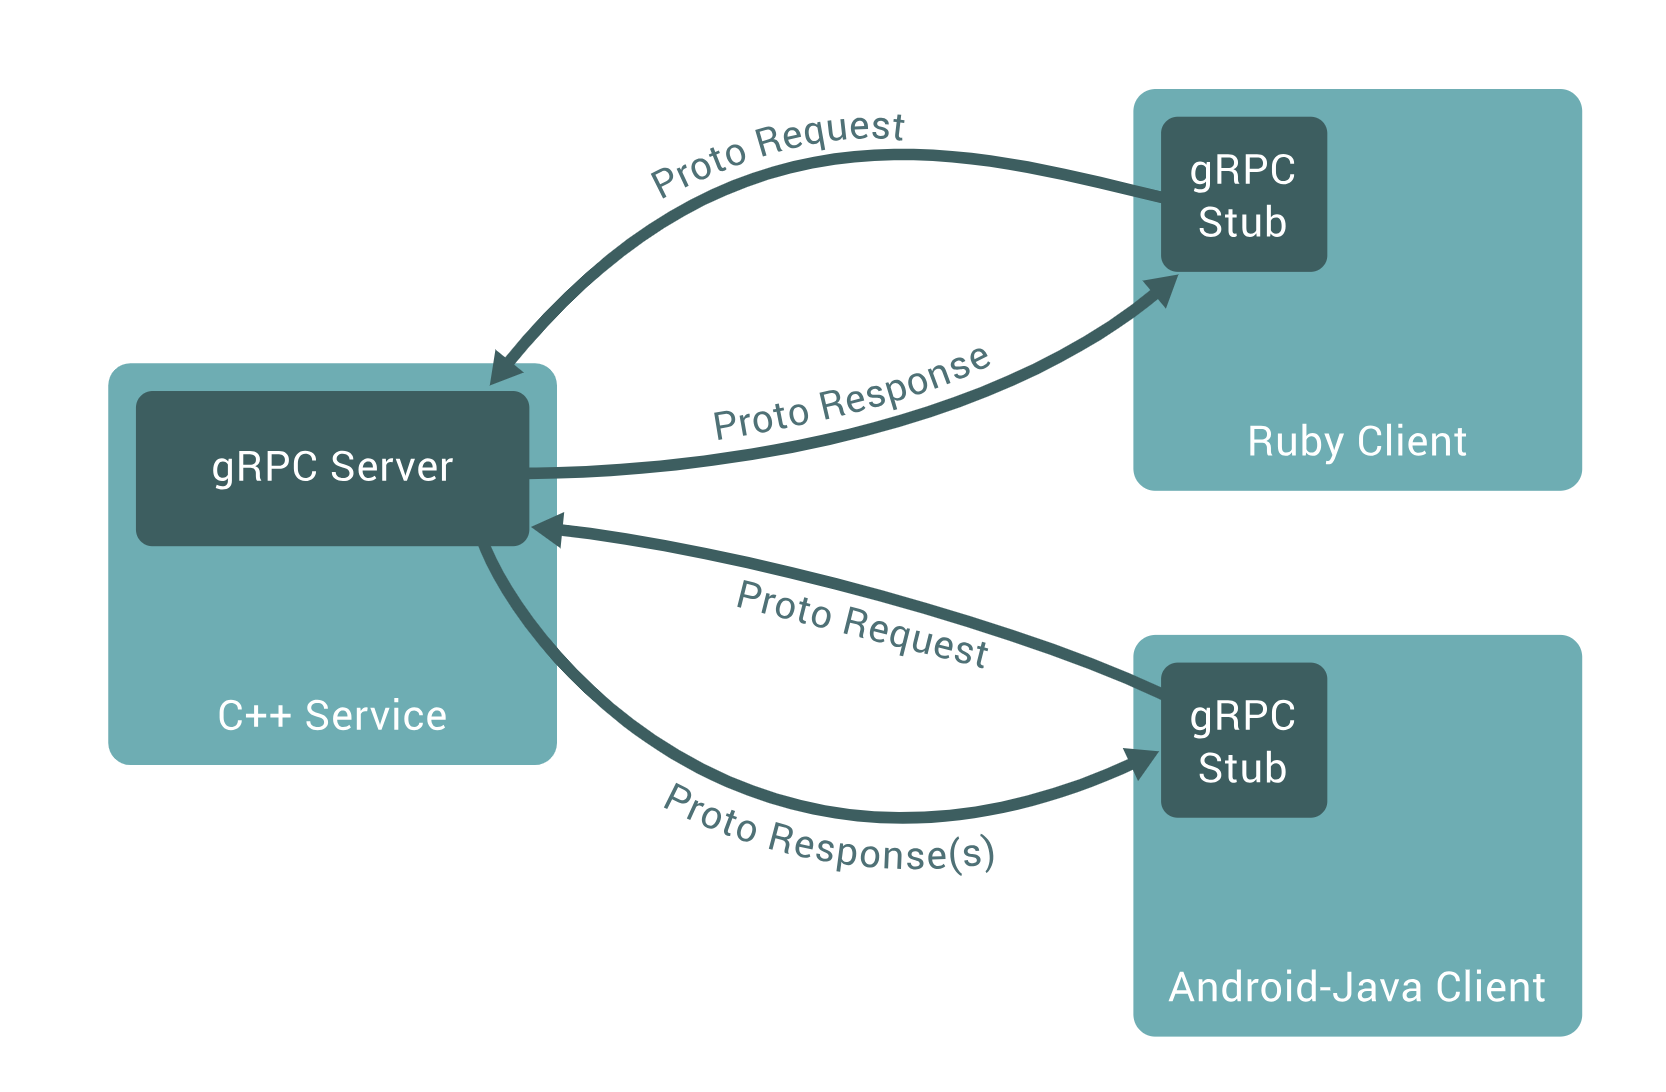
客户端普通拦截器
golang在调用grpc之前执行的公共的操作,比如要把requestId塞到header中。
1 2 3 4 5 6 7 8 9 10 11
// @params method: the RPC name // @params req: the request // @params resp: the response // @params cc: the ClientConn on which the RPC was invoked // @params invoker: the invoker of grpc methor // @params opts: the option func( ctx context.Context, method string, req, resp interface{}, cc *grpc.ClientConn, invoker grpc.UnaryInvoker, opts ...grpc.CallOption, )
客户端流失拦截器
实现如下签名的函数即可
1 2 3 4 5 6
// @params desc: contains a description of the stream // @params cc: the ClientConn on which the RPC was invoked // @params method: the RPC name // @params streamer: the handler to create a ClientStream and it is the responsibility of the interceptor to call it // @params opts: the option func(ctx context.Context, desc *StreamDesc, cc *ClientConn, method string, streamer Streamer, opts ...CallOption)(ClientStream, error)
"dynamic_templates": [ { "my_template_name": { ... match conditions ... "mapping": { ... } # match field use mappings } }, ... ] # The match conditions can include any of : match_mapping_type, match, match_pattern, unmatch, path_match, path_unmatch.
Turns on compression of the snapshot files. Compression is applied only to metadata files (index mapping and settings). Data files are not compressed. Defaults to true.
chunk_size
Big files can be broken down into chunks during snapshotting if needed. Specify the chunk size as a value and unit, for example: 1GB, 10MB, 5KB, 500B. Defaults to null (unlimited chunk size).
max_restore_bytes_per_sec
Throttles per node restore rate. Defaults to 40mb per second.
max_snapshot_bytes_per_sec
Throttles per node snapshot rate. Defaults to 40mb per second.
[root@VM-145-82-centos ~]# yum install logrotate Loaded plugins: fastestmirror Loading mirror speeds from cached hostfile Package logrotate-3.8.6-14.tl2.x86_64 already installed and latest version Nothing to do [root@VM-145-82-centos ~]#
1
2
3
4
5
6
root@VM-0-15-ubuntu:[10:59:47]:~# apt-get install logrotate
Reading package lists... Done
Building dependency tree
Reading state information... Done
logrotate is already the newest version (3.8.7-2ubuntu2.16.04.2).
0 upgraded, 0 newly installed, 0 to remove and 385 not upgraded.
[root@VM-145-82-centos /etc/logrotate.d/cron.30m]# logrotate -d /etc/logrotate.d/cron.30m/*
reading config file /etc/logrotate.d/cron.30m/nginx
Allocating hash table for state file, size 15360 B

Handling 1 logs

rotating pattern: /var/log/nginx/*log  after 1 days (10 rotations)
empty log files are not rotated, old logs are removed
considering log /var/log/nginx/access.log
  log does not need rotating (log is empty)considering log /var/log/nginx/error.log
  log does not need rotating (log is empty)not running postrotate script, since no logs were rotated
执行后,会输出文件怎么变更,压缩重命名等。比如上面会提示 “old logs are removed” “10 rotate” 等记录。
deferclose(data) // consumer gofunc() { for { select { case <-done: fmt.Println("child process interrupt...") return default: fmt.Printf("send message: %d\n", <-data) time.Sleep(time.Second * 1) } } }()
// producer for i := 0; i < 10; i++ { data <- i } time.Sleep(5 * time.Second) // 退出协程 close(done) time.Sleep(1 * time.Second) fmt.Println("main process exit!") }
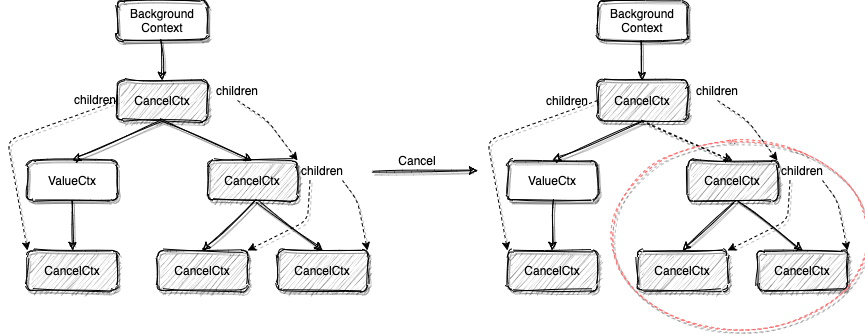
type cancelCtx struct { Context mu sync.Mutex // protects following fields done chanstruct{} // created lazily, closed by first cancel call children map[canceler]struct{} // set to nil by the first cancel call err error // set to non-nil by the first cancel call }
# Definition for singly-linked list. # class ListNode(object): # def __init__(self, x): # self.val = x # self.next = None
classSolution(object): defaddTwoNumbers(self, l1, l2): """ :type l1: ListNode :type l2: ListNode :rtype: ListNode """ l3 = None pre1 = l1 pre2 = l2 pre = l3 jin = 0# 进位 while pre1 and pre2: s = pre1.val + pre2.val + jin if s >= 10: jin = int(s / 10) s = s % 10 else: jin = 0 cur = ListNode(s) if pre: pre.next = cur pre = pre.next else: l3 = cur pre = cur pre1 = pre1.next pre2 = pre2.next left = pre1 if pre1 else pre2 while left: s = left.val + jin if s >= 10: jin = int(s / 10) s = s % 10 else: jin = 0 cur = ListNode(s) pre.next = cur pre = pre.next left = left.next if jin != 0: cur = ListNode(jin) pre.next = cur return l3